Skip to content

Settings

Settings is where you manage your account, secure your sign-in, control the look and language of Intra AI, build your personal prompt library, and keep track of your active sessions. Everything lives in one place – a row of tabs at the top of the Settings page.

At a glance: Click your name at the bottom of the sidebar → Settings to open it. Most changes save immediately or with a single Save button.

Note: Some tabs only appear when your administrator has enabled the related feature – for example, the News tab only shows when announcements are turned on for your workspace.


How to open Settings

  1. Look at the bottom of the left sidebar. You will see a button showing your name and initials.
  2. Click that button. A small menu pops up.
  3. Click Settings in the menu.

The Settings page opens. Across the top you will see a row of tabs:

TabWhat it covers
AccountName, username, email, password
SecurityTwo-factor authentication (2FA) and passkeys
PreferencesTheme (light / dark) and interface language
SessionsAll devices currently signed in
Data & PrivacyData export and terms-of-use history
Prompt templatesYour personal reusable message templates
OnboardingGuided product tours – replay or restart
NewsWorkspace announcements (shown when enabled by admin)

Click any tab to switch to it. On narrow screens the tab labels collapse to icons.

Settings page open on the Account tab, showing profile fields and a change-password form belowSettings page open on the Account tab, showing profile fields and a change-password form below


Account tab

The Account tab is where you update the information tied to your profile.

What you can change

FieldWhat it does
NameThe name other people see in shared conversations and projects.
EmailShown for reference only. You cannot change it here.
UsernameYour unique handle – used when someone searches for you to add you to a project or conversation. Must be unique across the workspace.

Note: If your account is managed through single sign-on (SSO – meaning your organisation controls your login through a central system), your display name and username are locked. You will see a blue notice that says these details are managed for you, and the fields are greyed out.

How to change your display name

  1. Open Settings → Account.
  2. Click into the Name field and type the new name.
  3. Click Save.
  4. A green confirmation toast appears. The sidebar immediately shows your new name.

How to change your username

  1. Open Settings → Account.
  2. Click into the Username field and type the new handle.
  3. Click Save.
    • If the handle is already taken, you will see an inline error. Choose a different one and try again.

Account badges

Below the form you will see two small badges:

BadgeMeaning
Admin or UserYour role in this workspace. Admins have access to the admin panel.
Email verifiedYour email address has been confirmed. If it shows "Not verified", contact your administrator.

How to change your password

The password section appears below the profile form (it does not appear for SSO accounts).

  1. Open Settings → Account.
  2. Scroll to Change password.
  3. Enter your current password.
  4. Enter your new password. It must be at least 12 characters long.
  5. Enter the new password again in Confirm new password.
  6. Click Update password.

Warning: Changing your password signs out every other session immediately. Your current browser session stays active.

Common errors when changing password:

ErrorWhat to do
Current password is wrongRe-enter the password you use to sign in.
Password too shortUse at least 12 characters.
Password is too weakAdd a mix of letters, numbers, and symbols.
Passwords do not matchMake sure both "new password" fields are identical.

Security tab

The Security tab combines two-factor authentication (2FA) and passkeys in one place.

Two-factor authentication (2FA)

Two-factor authentication adds a second check at sign-in: after your password, you enter a short code from an authenticator app on your phone. This means someone who learns your password still cannot sign in without your phone.

For the full step-by-step setup flow, see Login & Security.

From the Security tab you can:

  • Enable 2FA – if it is not yet set up, a button walks you through the process.
  • Register new device – replaces your authenticator app link with a new one (useful if you get a new phone).
  • Regenerate backup codes – produces a fresh set of one-time emergency codes. Old codes stop working immediately.
  • Disable 2FA – turns off the second sign-in check. You will be asked to confirm with your current authenticator code.

Tip: Keep your backup codes somewhere safe and offline (printed or in a password manager). They are the only way to recover access if you lose your phone.

Passkeys

Note: Passkeys only appear when your administrator has enabled this feature.

A passkey lets you sign in with your device's biometrics (fingerprint or face scan), your device login (Windows Hello or macOS Touch ID), or a hardware security key – instead of typing a password and a 2FA code. It is faster and more secure.

Each passkey card shows:

ElementMeaning
Phone iconThe passkey is stored on a mobile device.
QR / chain iconCross-device passkey, scanned from another device.
Key iconA hardware security key (for example, a YubiKey).
Synced badgeThe passkey is backed up by your platform (password manager or device account) and is available on your other devices.
Created / Last used datesWhen the passkey was registered and when it was last used to sign in.

How to add a passkey

  1. Open Settings → Security.
  2. Scroll to the Passkeys section.
  3. Click Add passkey (this opens the "Add a passkey" dialog).
  4. A dialog appears. Enter your current password.
  5. If you have 2FA enabled, also enter your authenticator-app code (the 6-digit code from your phone app, or a backup code).
  6. Optionally give the passkey a name – for example, Work laptop or iPhone.
  7. Click Create passkey.
  8. Your browser or device will prompt you to use your biometric or security key. Follow the on-screen prompt.
  9. The new passkey appears in the list.

Note: If your browser shows a message that passkeys are not supported, use a current browser that supports WebAuthn/FIDO2 – for example recent Chrome, Edge, Safari, or Firefox.

How to rename a passkey

  1. Open Settings → Security → Passkeys.
  2. Find the passkey and click the pencil icon.
  3. Type the new name (up to 64 characters).
  4. Click the green tick to save. Click the grey X to cancel without changing anything.

How to delete a passkey

  1. Open Settings → Security → Passkeys.
  2. Find the passkey and click the trash icon.
  3. A confirmation dialog appears with a warning.
  4. Enter your current password (and your authenticator-app code if you have 2FA on).
  5. Click Remove (the dialog is titled "Remove passkey").

Warning: If you delete your last passkey and do not have another way to sign in set up, you could lock yourself out. Keep at least one active sign-in method at all times.

SSO accounts

If your account is managed through single sign-on, both the 2FA controls and the Passkeys section are hidden. Authentication is handled entirely by your organisation.

Security tab showing 2FA controls and the passkeys section with an Add passkey buttonSecurity tab showing 2FA controls and the passkeys section with an Add passkey button


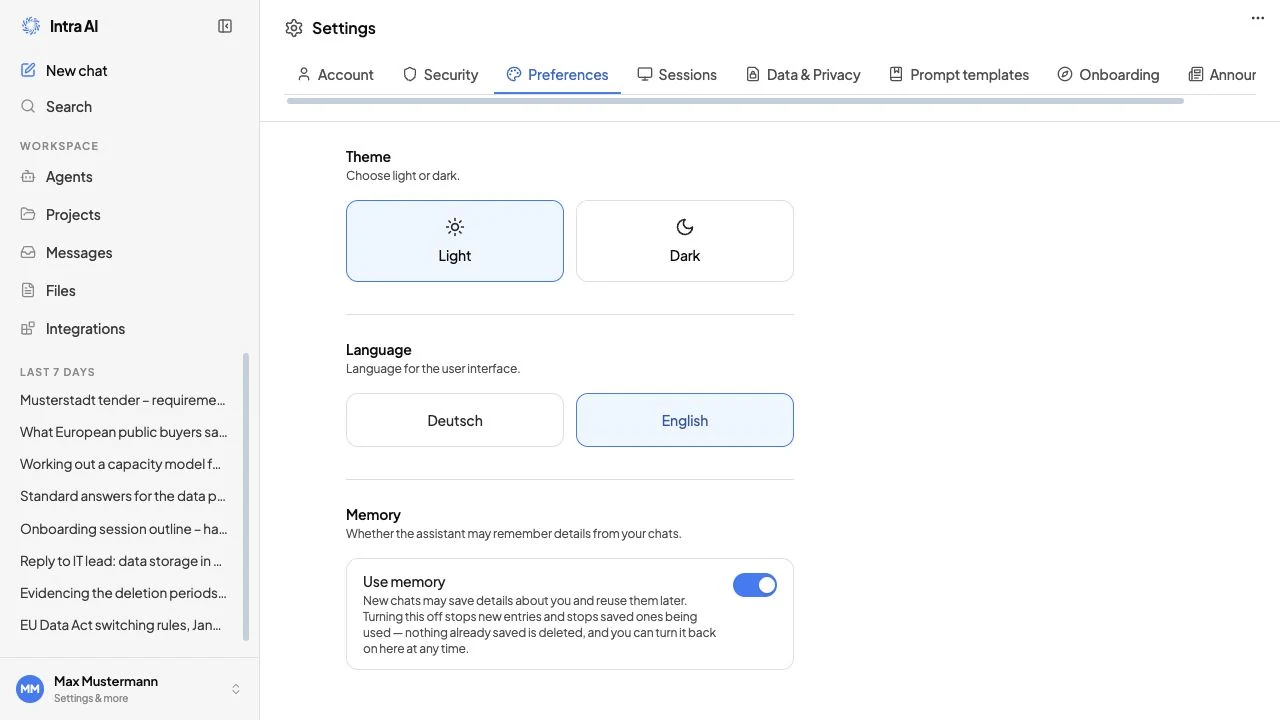
Preferences tab

The Preferences tab controls how the Intra AI interface looks and what language it uses. These settings are saved to your account, so they follow you across every device you sign in on.

Theme

Two large tile buttons show Light (sun icon) and Dark (moon icon). The active choice has a blue border.

How to switch theme:

  1. Open Settings → Preferences.
  2. Click Light or Dark.
  3. The interface changes immediately – no Save button needed.

Language

Two tile buttons show Deutsch and English.

How to change language:

  1. Open Settings → Preferences.
  2. Click Deutsch or English.
  3. The interface text switches immediately – menus, buttons, labels, and error messages all change.

Note: The language setting changes only the Intra AI interface text. It does not change the language the AI replies in. The AI answers in whatever language you write your message in.

Preferences tab showing the Light and Dark theme tiles, and Deutsch / English language tiles belowPreferences tab showing the Light and Dark theme tiles, and Deutsch / English language tiles below


Sessions tab

The Sessions tab lists every device and browser that is currently signed in to your account.

Each session card shows:

ElementMeaning
Browser / device nameThe user-agent string reported by that browser.
This session badgeThis is the session you are using right now.
Signed-in timeThe date and time this session was created.
IP addressThe network address the session came from (shown when available).

How to sign out a single session

  1. Open Settings → Sessions.
  2. Find the session you want to end. (You cannot remove your current session from this list.)
  3. Click the trash icon on the right of that row.
  4. The session is removed and that device is signed out immediately.

How to sign out all other sessions at once

  1. Open Settings → Sessions.
  2. Click Sign out all others (shown at the top-right of the tab when other sessions exist).
  3. A confirmation dialog tells you how many sessions will be ended.
  4. Click Sign out all to confirm.
  5. Every session except your current one is ended immediately.

Tip: If you think someone else has access to your account, sign out all other sessions here – and then change your password to prevent them signing back in.

Sessions tab showing three session cards; the current one has a green badgeSessions tab showing three session cards; the current one has a green badge


Data & Privacy tab

The Data & Privacy tab gives you a copy of your personal data and a record of your terms-of-use history.

How to download your data

  1. Open Settings → Data & Privacy.
  2. Click Download data.
  3. Intra AI prepares and downloads a JSON file to your browser's default download location.

The archive contains:

  • Your profile and preferences
  • All your conversations and messages
  • Files you have uploaded
  • Your agents, memories, and prompt templates
  • Your artifacts
  • Your account audit log (sign-in events, setting changes)
  • Token-balance records and usage events
  • Projects you own or are a member of

Note: JSON (JavaScript Object Notation) is a plain-text format that any text editor or spreadsheet app can open.

Terms-of-use history

Below the download button you will see a record of when you accepted (or declined) the workspace terms of use. Each entry shows the version number and the exact date and time of the event. This section is informational – there are no actions to take here.


Prompt templates tab

The Prompt templates tab is your personal library of reusable message templates. Save the templates you use most often and insert them into the chat composer instantly with a / shortcut.

Tip: Your administrator may also publish shared, organisation-wide templates. These appear in the same / list in the chat composer alongside your own.

How prompt templates work in chat

When you type / in the chat composer, a picker appears listing all your personal templates and any shared ones from your workspace. Click a template to paste its text into the composer.

If the template has variables – placeholders written as {{variable_name}} – a small dialog appears asking you to fill in each value before the text is inserted. For example, a template written as Translate the following into {{language}}: {{text}} will ask you to supply the language and the text.

A small blue badge on each template card shows how many variables it contains.

How to create a prompt template

  1. Open Settings → Prompt templates.
  2. Click the blue Create template button.
  3. An inline form expands. Enter a title – this is what you will see in the / picker list.
  4. Enter the template text. Include placeholders in double curly braces, e.g. {{topic}}, wherever you want to fill something in at use-time.
  5. Click Save.

How to edit a prompt template

  1. Open Settings → Prompt templates.
  2. Find the template and click the pencil icon.
  3. Edit the title or body text.
  4. Click Save.

How to delete a prompt template

  1. Open Settings → Prompt templates.
  2. Find the template and click the trash icon.
  3. The template is removed immediately.

Warning: Deleting a prompt template is immediate and cannot be undone. Recreate it manually if needed.

Prompt templates reference

FieldRequiredNotes
TitleYesShown in the / picker. Keep it short and descriptive.
Body / template textYesThe message text inserted into the composer.
VariablesAutomaticAny {{name}} in the body is detected as a variable. The badge shows the count.

Prompt templates tab with two saved templates; one has a blue variable badge showing "2"Prompt templates tab with two saved templates; one has a blue variable badge showing "2"


Onboarding tab

The Onboarding tab lets you replay the guided product tours at any time. Tours walk you through the main features of Intra AI step by step when you first encounter them. From this tab you can restart any individual tour or reset all of them at once.

Note: Tours whose underlying feature has been disabled by your administrator are automatically hidden from this list. For example, the Projects tour will not appear if Projects are not enabled in your workspace.

Tour statuses

Each tour row shows one of four statuses:

StatusColourMeaning
OpenBlueYou have not started this tour yet.
CompletedGreenYou finished the tour.
SnoozedAmberYou chose "Remind me later". The tour will be offered again automatically.
DismissedGreyYou permanently closed the tour without completing it.

Available tours

The tours that appear in the list depend on which features your administrator has enabled:

TourFeature required
Getting started in chatAlways shown
AgentsAgents must be enabled
ProjectsProjects must be enabled
FilesUploads must be enabled
IntegrationsIntegrations must be enabled
Agent BuilderAgents must be enabled
New ProjectProjects must be enabled
Connect IntegrationIntegrations must be enabled

How to replay a single tour

  1. Open Settings → Onboarding.
  2. Find the tour you want to revisit.
  3. Click Replay on that row.
  4. Intra AI navigates to the relevant page and the tour starts immediately from the beginning.

How to restart all tours

  1. Open Settings → Onboarding.
  2. Click Restart all tours at the top right.
  3. A confirmation dialog appears – confirm to proceed.
  4. All tour statuses reset to Open and the main chat tour launches automatically.

Onboarding tab listing tours with Completed, Open, and Snoozed status badges and a Replay button on each rowOnboarding tab listing tours with Completed, Open, and Snoozed status badges and a Replay button on each row


News tab

Note: The News tab only appears when your administrator has enabled workspace announcements.

The News tab lists all current and past announcements from your workspace administrator. You can control which ones show as a floating banner at the top of the app, and open any announcement to read its full text.

Each announcement row shows:

ElementMeaning
Severity chipThe announcement type – Update, Maintenance, or Outage – as a coloured badge.
TitleThe announcement headline.
DateWhen the announcement was published.
Short descriptionThe one-line banner text.

Show or hide an announcement in the banner

  • Click Hide from banner (eye-off icon) to stop that announcement appearing in the notification banner at the top of the app.
  • Click Show in banner (eye icon) to restore a previously hidden announcement to the banner.

This only affects what you see – it does not affect other users.

Open an announcement's full text

Click Open (the chevron button) to read the full announcement in a modal. This button is only active for announcements that are currently active. Older archived announcements show the button greyed out.


Token balance

If your workspace uses the token credit system, your remaining credits appear directly in the account menu – the button at the bottom of the sidebar that shows your name.

The balance widget shows:

ElementMeaning
Progress barFills as you use credits. Colour: blue (under 50% used) → amber (50%) → orange (80%) → red (95%).
Remaining creditsThe exact number of credits you have left.
Total creditsYour starting amount, shown as "of X".
Usage percentageHow much of your balance you have consumed.
Next top-up dateShown when your administrator has set an automatic refill schedule.

Usage alerts (shown once per session, at the highest threshold crossed):

Threshold reachedAlert
50% usedInformational notice
80% usedWarning (with next top-up date when scheduled)
95% usedStrong alert

Note: Token credits track your AI usage. When they run low, your administrator can adjust your balance or set up an automatic top-up schedule.


Your instance's appearance

Your instance ships in your own corporate design: logo, accent colours and background image are configured at setup and apply to everyone in your organisation. There is no self-service option in Settings or in the admin area – the values live in your instance's configuration, and we change them for you.

Send us the logo file and the colour values you want used, and we apply them to your instance. If your brand is centrally managed in FILERO, the connector can supply any value your configuration leaves blank.


Settings reference table

SettingTabNotes
Display nameAccountVisible to others in shared spaces; locked for SSO accounts
UsernameAccountMust be unique; locked for SSO accounts
PasswordAccountMin 12 characters; changing it signs out all other sessions
Two-factor authenticationSecurityRequires an authenticator app on your phone
PasskeysSecurityShown only when admin has enabled passkeys; requires password (+ 2FA code) to add or remove
ThemePreferencesLight or Dark; saved to account; applies on all devices
LanguagePreferencesDeutsch or English; changes interface text only, not AI responses
Personal prompt templatesPrompt templatesInsert in chat with /; shared organisation-wide templates appear in the same list
SessionsSessionsRevoke one session or all other sessions at once
Data exportData & PrivacyDownloads a JSON archive of your profile, conversations, and audit log
Onboarding toursOnboardingReplay individual tours or reset all; hidden tours = disabled feature
News / announcementsNewsTab shown only when admin enables announcements

Troubleshooting

SymptomLikely causeWhat to do
Display name and username fields are greyed outAccount is managed via SSOContact your IT administrator.
No Passkeys section on the Security tabAdmin has not enabled passkeysAsk your workspace administrator to enable the passkeys feature.
News tab is missingAdmin has not enabled announcementsContact your workspace administrator.
"Username already taken" error when savingAnother account uses that handleChoose a different username.
Browser says passkeys are not supported when trying to add oneOlder browser or deviceUse a current browser that supports WebAuthn/FIDO2 (for example recent Chrome, Edge, Safari, or Firefox) on a device with biometrics or a hardware security key.
Changing my password signed me out on another deviceExpected behaviourChanging the password ends all other sessions immediately for security.
A tour does not appear in the Onboarding tabThe tour's feature is disabled in your workspaceAsk your administrator to enable the relevant feature (Agents, Projects, Files, or Integrations).
Token balance bar is not visibleToken balance system not enabledYour administrator has not set up the token credit system.
Clicking "Open" on a News item is greyed outThe announcement is no longer in the active setOlder archived announcements cannot be opened in the full detail view.

Frequently asked questions

Q: Will changing my theme or language affect other users? A: No. Theme and language are personal settings. Other users see their own preferences.

Q: Can I register more than one passkey? A: Yes. You can add as many passkeys as you like – one per device is a common approach.

Q: What happens if I replay a tour I already completed? A: The tour restarts from the beginning and the status resets to Open. Your previous completion is cleared.

Q: If I download my data, does it delete anything? A: No. Downloading is a read-only export. Nothing in Intra AI is changed or deleted.

Q: Can I recover a prompt template I deleted? A: No. Prompt deletion is immediate and permanent. You will need to recreate it manually.

Q: I hid an announcement from the banner – is that permanent? A: No. You can restore a hidden announcement at any time in the News tab using the Show in banner button.

Q: Does the AI use my language preference when generating replies? A: No. The language preference changes only the interface labels, menus, and buttons. The AI responds in whatever language you write your message in.

Q: Changing my password signed out my phone. Is that normal? A: Yes. This is intentional security behaviour. Changing your password ends all other active sessions. Sign in again on your phone with the new password.


Related: Login & Security · Getting Started · Chatting