Projects
Projects in Intra AI are shared workspaces where a team works with AI around the same set of files and conversations. A project bundles members, documents, conversations, and agents under one roof, so everyone draws on the same knowledge – no manual copy-pasting of context between chats.
At a glance: Go to Projects in the sidebar → click New Project to create one. Your projects appear as a card grid.
Note: Projects is enabled by default. If the Projects item is missing from the sidebar, your administrator has disabled it – ask them to turn it back on.
What a project is
Think of a project as a dedicated room for a team or topic. Everything inside the room – files, conversations, and AI agents – is scoped to that project. When you start a chat inside a project, the AI automatically draws on every file attached to the project, so you never have to re-upload reference material or remind the AI what your team is working on.
When to use a project:
- A long-running client engagement (example: "Client: Müller GmbH") where the whole team needs the same contracts and briefs in every AI conversation.
- A campaign or initiative (example: "Marketing 2026") where multiple people contribute documents and want to share conversation threads.
- A shared knowledge base – product docs, onboarding materials, research archives – that any member can query at any time.
When a project is not needed:
- A one-off chat just for you – use personal chat instead.
- Uploading a single file for a single question – attach the file directly to a chat without creating a project.
Creating a project
Any user can create a project. The person who creates it automatically becomes its Owner.
-
Click Projects in the left sidebar.
-
Click New Project (top right of the page).
The projects page card grid with collaboration-type badges -
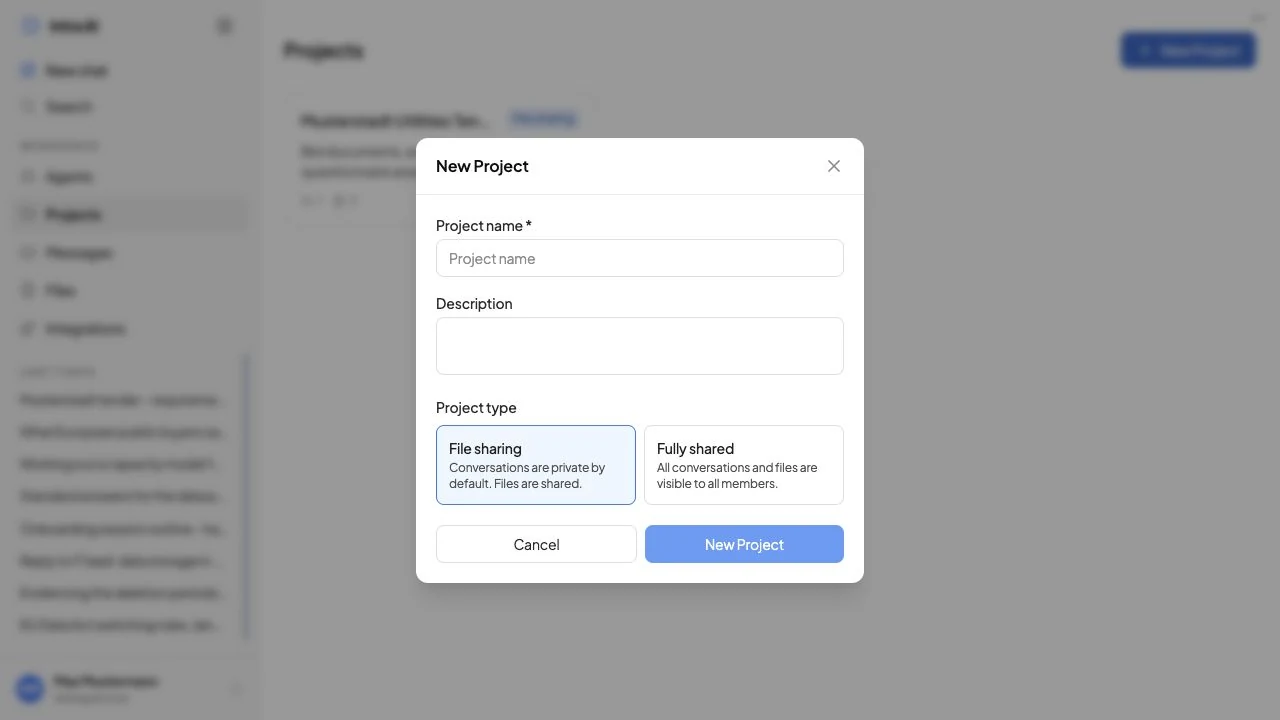
The New Project dialog opens. Fill in:
- Project name (required) – for example, "Client: Müller GmbH" or "Marketing 2026".
- Description (optional) – a short note to help teammates understand the project's purpose.
-
Choose a Project type – see the section below for the difference.
-
Click New Project to confirm.
You land on the project detail page. From here you can add members, attach files, and start conversations.
Note: The project name and description are encrypted at rest.
Choosing a project type
When you create a project you pick a collaboration type. This controls how much your teammates can see.
| Type | What members share |
|---|---|
| File sharing | Every member's conversations stay private by default. All attached files are available to everyone's AI context within the project. You can selectively share individual conversations. |
| Fully shared | All conversations and files are visible to every member of the project automatically. |
The type label appears as a coloured badge on each project card: blue for File sharing, purple for Fully shared.
The create-project dialog showing the two collaboration-type options
File sharing – when to use it
Choose File sharing when a department or client team wants a common pool of reference documents but each person keeps their own conversation history private. A paralegal team uploading contracts and a support team sharing a product knowledge base are both good examples.
- Files attached to the project are shared – everyone's AI draws on them.
- Conversations are private to the person who created them, unless you explicitly share one.
- Sharing a conversation is a one-click action from the Conversations tab (see Starting a project conversation).
Fully shared – when to use it
Choose Fully shared for close teamwork where everyone should see the same conversation history. A small sprint team, a client project with daily standups, a research group working through sources together – all are good fits.
- Both files and conversations are visible to all members automatically.
- There is no per-conversation sharing toggle – visibility is project-wide.
Tip: You cannot change the project type after creation. Pick it carefully. If you need a different type, delete the project and create a new one – conversations and files are not deleted, so you can re-attach files.
Members and roles
Adding a member
Owners and admins can add people to a project.
- Open the project and click the Members tab.
- In the Add member section, type the person's email address (for example,
anna.weber@example.com). The field searches as you type. - Select the correct person from the results.
- Choose a role: Admin or Member.
- Click Add member.
Anna Weber now appears in the members list with her assigned role badge.
Roles explained
| Role | What they can do |
|---|---|
| Owner | Full control. Manage all members, change roles, attach their own files, detach any file, configure the project, and delete it. There is always exactly one Owner per project. |
| Admin | Add and remove members, attach their own files, detach any file, assign agents, and change project settings. Cannot delete the project or change the Owner's role. |
| Member | Use the project, start conversations, and attach their own files. |
Changing a member's role
Only the Owner can change roles. In the Members tab, use the role dropdown next to a member's name to switch them between Admin and Member. The Owner's own role cannot be changed.
Removing a member
- The Owner can remove any admin or member.
- An Admin can remove members (but not other admins or the owner).
- Click the remove icon (person-with-minus) next to a member and confirm.
Note: Removing a member does not delete their conversations or files, but it unlinks all of that member's conversations from the project. After removal none of their conversations remain visible to the remaining members (including ones that were shared, and every conversation in a Fully shared project) – they revert to the ex-member's personal conversations. Files they attached stay attached to the project.
Note: The owner cannot be removed. A project always has exactly one owner.
Leaving a project
You cannot leave a project if you are the owner. If you are an admin or member, ask the owner or an admin to remove you.
The Files tab – shared project knowledge
Every file attached to a project becomes part of the shared knowledge base. The AI uses retrieval – a process where it searches your files and quotes the relevant parts – across all project files automatically in every conversation started inside that project. You do not need to opt in per chat.
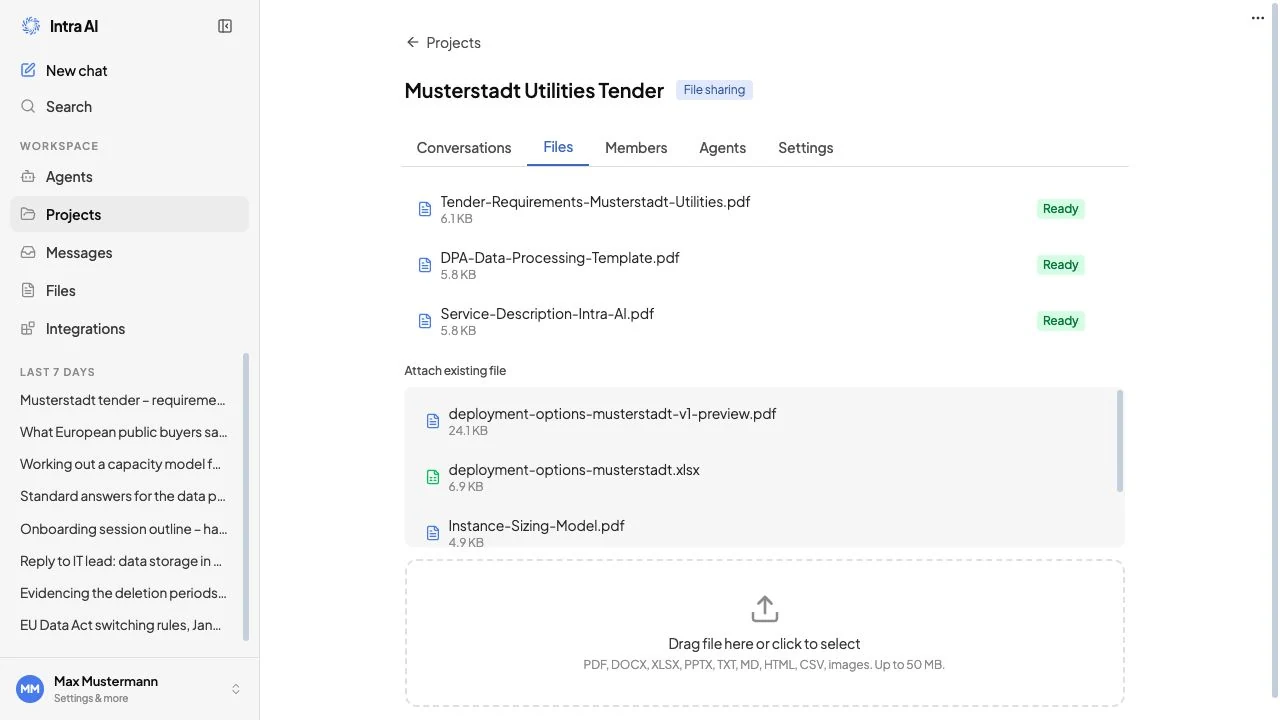
The project Files tab listing shared documents with their processing status
Attaching a file
You can attach a file you have already uploaded to your personal files, or upload a new file directly into the project.
Attach an existing file:
- Open the project and click the Files tab.
- The Attach existing file section lists your personal files not yet attached. Click any file to attach it.
Upload a new file directly:
- On the Files tab, drag a file onto the upload zone at the bottom, or click it to open the file picker.
- The file uploads and is attached to the project in one step.
Accepted file types include PDF, Word documents, text files, Markdown, Excel spreadsheets, PowerPoint presentations, CSV files, HTML, and images. Your administrator configures the exact types and size limits for your workspace.
How project files feed the AI
When you start a chat inside a project, the system combines:
- Files attached directly to that conversation (personal).
- All ready files attached to the project (shared).
The combined set is deduplicated and passed to the AI's retrieval layer. The AI cites the relevant chunks in its answer. Project files never appear in your personal chats outside the project.
Detaching a file
Detaching removes the file from the project's shared pool but does not delete it. The file stays in its owner's personal file library.
- Members cannot detach files from the Files tab – the detach icon is shown only to Owners and Admins.
- Admins and Owners can detach any file in the project.
Click the detach icon next to a file in the Files tab and confirm.
Starting a project conversation
Starting a chat inside a project scopes that conversation to the project so it draws on the shared knowledge base automatically.
-
Open the project and click the Conversations tab.
-
Click New Conversation.
The project chat landing with the project-context banner and agent quick-select buttons -
The chat screen opens with a blue project-context banner and quick-access buttons for agents assigned to the project. Click an agent button to start with that agent, or type directly to use the default model.
-
Chat normally. The AI retrieves from all project files automatically.
Project conversations live at their own address, separate from your personal chat history. Your personal sidebar and your project conversations stay cleanly apart.
Sharing a conversation (File sharing projects only)
In a File sharing project, your conversations are private by default. To let teammates read one:
- On the Conversations tab, find the conversation you want to share.
- Click the Share in project button next to it. The button turns green and shows a Shared badge.
Teammates can now see that conversation in the project's Conversations tab. To make it private again, click Unshare on the same button.
Note: In a Fully shared project, every conversation is visible to all members automatically – there is no per-conversation sharing button.
Assigned agents
Owners and admins can pin agents to a project so they appear as quick-select buttons on the project chat landing screen.
Assigning an agent
- Open the project and click the Agents tab.
- Click Assign agent.
- Search for the agent by name and click it to assign.
If the agent is private (only you can see it), assigning it to the project shares its configuration with every member. You will see a confirmation prompt before the assignment is saved.
Agent badges
| Badge | Meaning |
|---|---|
| My agent (blue) | You own this agent. |
| Private (amber) | A private agent owned by another member – visible here because it was assigned to this project. |
| Config (grey) | This agent is managed via YAML configuration, not the admin UI. |
Removing an agent from a project
Click the × button on an agent card in the Agents tab and confirm. This removes the assignment – it does not delete the agent itself. Private agents can only be removed by their owner; shared and global agents can be removed by any owner or admin.
Project settings – chunking strategy
Owners and admins see a Settings tab inside the project. Here you can override how the project's shared documents are split (chunked) for retrieval.
| Setting | What it controls |
|---|---|
| Chunking strategy | How documents are split – by character count, by heading, or semantically. |
| Chunk size | The token length of each chunk. |
| Overlap | The percentage of each chunk that adjacent chunks repeat, to preserve context across chunk boundaries. |
Leave all settings at Inherit to use the system default configured by your administrator. Only override when the project's documents have an unusual structure – for example, a document that is one enormous table benefits from a smaller chunk size.
Tip: If you are unsure, leave retrieval set to inherit the system default. Only override it when a project's documents have an unusual structure.
Deleting a project
Only the Owner can delete a project.
- Open the project and click the Members tab.
- Scroll to the bottom and click Delete project.
- Confirm in the prompt. The confirmation message reads: "Really delete this project? Conversations and files remain intact."
Deleting a project removes the project and clears its association from all conversations and files. The conversations and files themselves are not deleted – they stay accessible to their owners in their personal libraries.
Reference tables
Sharing types
| Type | Conversations visible to | Files visible to |
|---|---|---|
| File sharing | Creator only, unless shared | All members |
| Fully shared | All members | All members |
Member roles
| Role | Add/remove members | Change roles | Attach any file | Detach any file | Assign agents | Change settings | Delete project |
|---|---|---|---|---|---|---|---|
| Owner | Yes | Yes | Own files only | Yes | Yes | Yes | Yes |
| Admin | Yes (members only) | No | Own files only | Yes | Yes | Yes | No |
| Member | No | No | Own files only | No | No | No | No |
Project detail tabs
| Tab | Who sees it | What it contains |
|---|---|---|
| Conversations | All members | List of visible conversations; New Conversation button; Share/Unshare per conversation (File sharing only) |
| Files | All members | Shared file list; attach existing files; upload new files |
| Members | All members | Member list with roles; add-member form (owners and admins only) |
| Agents | All members | Agents assigned to this project; assign/remove controls (owners and admins only) |
| Settings | Owners and admins only | Per-project chunking strategy override |
Tips and notes
Tip: Start with File sharing if you are unsure. You can always create a new fully-shared project later – and existing files are easy to re-attach.
Tip: Attach your most important reference documents to the project as soon as you create it. Every member's conversations will benefit immediately.
Tip: Agents assigned to a project appear as one-click buttons on the chat landing screen. Assign your team's most-used agent (for example, "Research Analyst") so nobody has to search for it.
Note: A file must finish processing before the AI can retrieve from it. The Files tab shows a status indicator next to each file. Large documents may take a minute or two.
Note: There is always exactly one Owner per project. Ownership cannot be transferred. If the owner leaves the organisation, an administrator can manage the project via the admin panel.
Troubleshooting
| Symptom | Likely cause | What to do |
|---|---|---|
| Projects is not in the sidebar | The feature is disabled for your workspace | Ask your administrator to enable Projects |
| You can see the project but not the Settings tab | You are a Member, not an Admin or Owner | Ask the Owner to promote you to Admin |
| A file you attached is not being used by the AI | The file is still processing | Wait for the status indicator to show ready, then retry |
| A file you want to attach does not appear in the list | The file belongs to another user | Ask that user to attach it, or upload your own copy |
| You cannot remove a member | The member is the Owner, or you are a Member trying to remove someone | Only the Owner can remove admins; only the Owner or an admin can remove members |
| A conversation is not visible to a teammate | Project type is File sharing and the conversation was not shared | Share the conversation via the Conversations tab, or switch to a Fully shared project |
| You cannot delete the project | You are not the Owner | Ask the Owner to delete it |
| "User not found" when adding a member | The email address is not registered in this workspace | Only existing workspace accounts can be added; the administrator creates accounts |
Frequently asked questions
Q: Can I change a project's collaboration type after creating it? A: No. The type is set at creation and cannot be changed. Create a new project with the desired type and re-attach the files if needed.
Q: Do project files count against my personal storage? A: Files are owned by the person who uploaded them. Attaching a file to a project makes it available to everyone, but it still sits in your personal file library.
Q: What happens to conversations when I delete a project? A: Conversations are not deleted. They become regular personal conversations accessible to their owners. The project context (shared files, shared visibility) is removed, but the message history stays intact.
Q: Can I be in more than one project? A: Yes. You can be a member of as many projects as the administrator allows.
Q: Can a private agent I own be seen by teammates once I assign it? A: Yes. Assigning a private agent to a project makes the agent visible to all project members while it is assigned. You will see a confirmation prompt before the assignment is saved.
Q: Can I start a project conversation from my personal chat sidebar? A: No. Project conversations are accessed through the project's Conversations tab or from the project chat landing screen. They do not appear in your personal chat list.
Related: AI Agents · Files & Knowledge · Chatting