AI Agents & Builder
An agent in Intra AI is a reusable AI assistant you configure once and run again and again. Instead of re-explaining your task every time you open a chat, you capture the instructions, the model, the tools, and the reference material in one saved configuration – then start a conversation that already knows what to do.
This page explains everything: how to find and use existing agents, how to build your own from scratch, and how to take advantage of advanced features like sub-agents, form agents, per-user configuration, and the built-in evaluation tab.
At a glance: Open the Agents page from the sidebar and click + New Agent. The builder walks you through seven steps and saves as you go; the last step, Overview, is where you finish the agent.
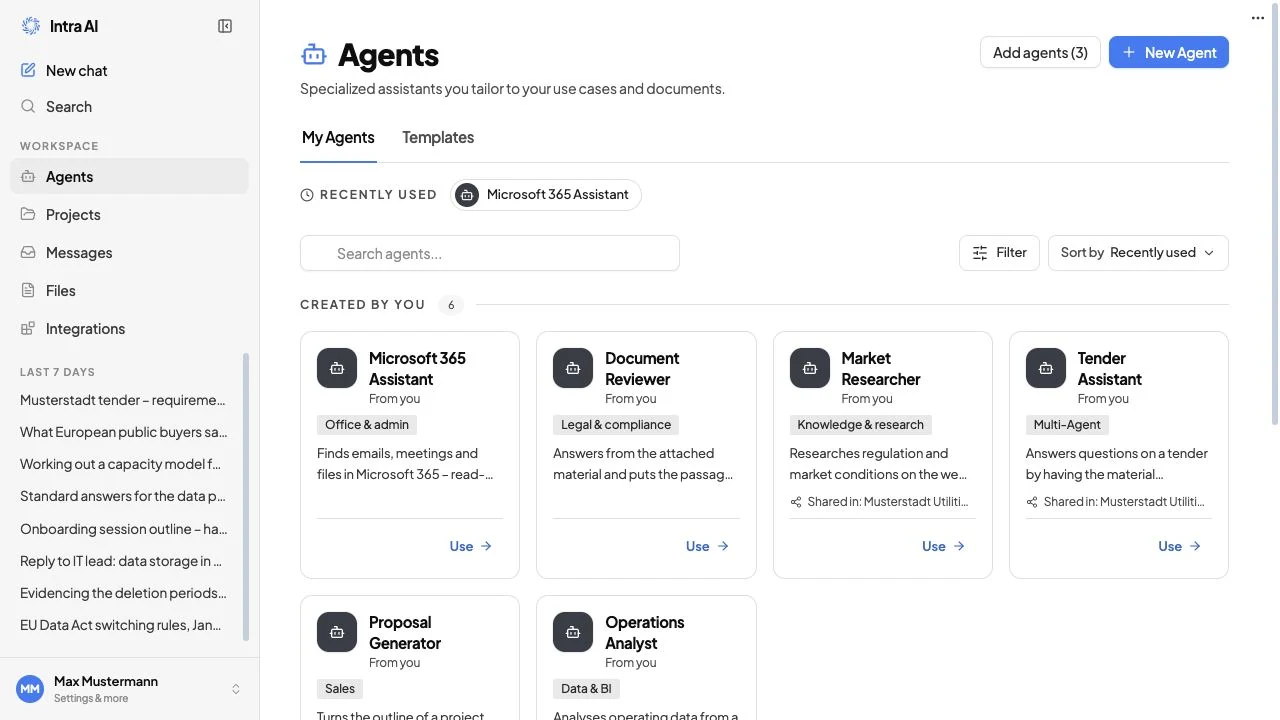
The Agents page with a recommended agent and your agent library
What an agent is
An agent bundles everything a conversation needs into one persistent configuration:
- A system prompt (called "instructions") that defines its role, tone, and rules
- A pinned model and provider it always answers with
- A set of tools (file search, web search, integrations, and more) it is allowed to use
- Optional knowledge files it can draw on – its own private searchable library
- Optional context files – short documents injected in full on every turn
- Per-turn limits that keep each response in check
- An icon, gradient, category, and description so it is easy to recognise in the gallery
Every conversation started with an agent runs through that shared configuration. Change the agent and every future conversation that uses it picks up the change immediately.
Agents come from two places:
- Builder agents – created in the visual builder and saved to your workspace. You can edit, share, clone, and delete them.
- Config agents – declared by your administrator in the instance configuration file and loaded when the platform starts. These carry a Config badge in the builder and every field is read-only. They cannot be edited or deleted from the interface.
Note: The richer parts of the agent experience – the discovery page, the template gallery, cloning, and sub-agents – depend on the agents feature being enabled for your workspace. If the Agents page is not visible in your sidebar, ask your administrator to enable it.
The Agents page
Open the Agents page from the main sidebar. You will see:
| Area | What it is |
|---|---|
| + New Agent button | Top-right of the page header; opens the builder on a blank form |
| My Agents / Templates tabs | Switch between your workspace agents and the community template gallery |
| All / Mine scope toggle | Under the My Agents tab: All shows every agent you can access; Mine shows only agents you own |
| Search bar | Filters by name, description, category, and tags in real time |
| Recommended carousel | A sliding strip of up to three featured agents curated by your administrator (only shown when at least one has been set up) |
| Recently used rail | A quick-access strip of the last five agents you opened (stored locally in your browser) |
| Agent grid | All matching agents as cards |
The recommended-agents carousel at the top of the Agents page
Each agent card shows the agent's gradient cover band, icon, name, category badge (including a Multi-Agent badge when the agent has sub-agents), description, tags, and owner. An overflow ⋯ menu on cards you own offers Edit, Duplicate, Share, and Delete.
Clicking a card's name or cover opens the builder. Clicking Use → on a card starts a new conversation with that agent immediately.
Create your first agent – step by step
This walkthrough builds a "Workspace Assistant" agent: a general assistant that can search the web and always replies concisely.
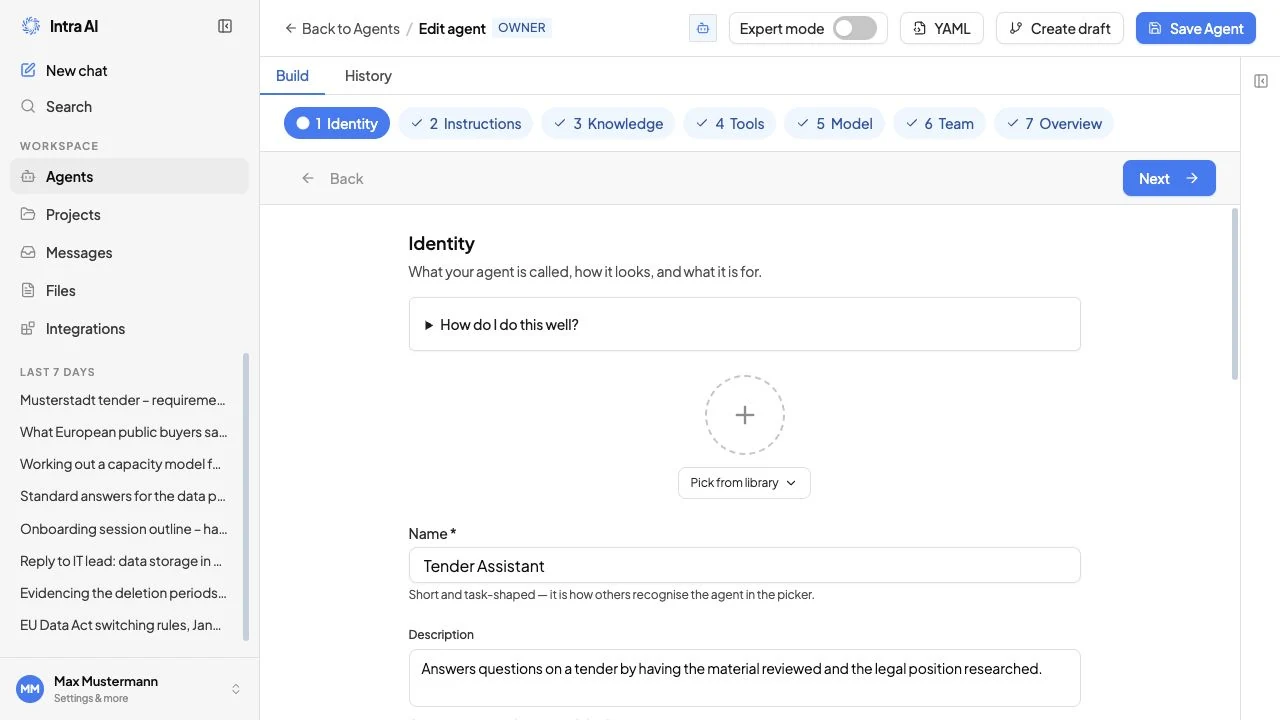
The builder is a guided pipeline of seven steps – Identity, Instructions, Knowledge, Tools, Model, Team, Overview. Every step is reachable from the stepper at the top, so you can jump back at any time without losing anything. There is no Save button: the builder saves as you go and reports Saves automatically in the header.
Step 1 – Identity
Click + New Agent in the top-right of the Agents page. The builder first asks how you want to start: Start blank, Import YAML, or Start from a template. Choose Start blank.
Then describe who the agent is:
- Name – type
Workspace Assistant. This is the one field the builder requires before you can move on. Keep it short and task-shaped; it is how colleagues recognise the agent in the picker. - Description – one sentence on when to reach for this agent, for example
Your everyday assistant for writing, research, and quick answers. - Category – pick the closest category from the dropdown (for example Productivity). It groups the agent in the gallery and sets the default gradient.
- Icon – click the icon area to pick from the built-in icon library, or upload a PNG/JPG/WebP/GIF image (up to 10 MB; non-GIF images are downscaled to a 512px WebP before storage). If you skip this, a default robot icon is used.
- Thumbnail gradient – choose a colour band for the agent card. Left blank, a colour is derived from the category.
- Tags – a few short labels (for example
writing,research) so people can find the agent by search. - Input type – free chat (the default) or a form. Choose a form only when you always need the same inputs; see Form agents.
- Conversation starters – one or two suggested opening questions. They appear as clickable chips when someone opens a new conversation with the agent.
- User configuration fields – inputs each person fills in once for themselves, such as their own email signature. See Per-user configuration.
Click Next. At that point the agent is created as a draft that only you can see. That is what lets the later steps attach files, tools and members to a real agent rather than to a form in your browser.
Step 2 – Instructions
This is the system prompt, and the field that decides most of the agent's behaviour. It sets the role, tone, rules and output format, and it applies on every turn – not just the first.
You are a friendly, concise workplace assistant for a professional team.
Always reply in the same language the user writes in.
Cite your sources when you use web search results.
Keep answers under 300 words unless the user asks for more detail.
Two aids sit alongside the field:
- Optimize – sends your draft to the AI, which rewrites it into a sharper prompt. The suggestion appears side by side so you can Accept or Discard it – nothing changes until you decide.
- Templates – three starting structures (Assistant, Extractor, Reviewer), each with a one-line note on what it is for. Clicking one inserts it into the field for you to adapt.
Turn on Expert mode in the header to see a note on what else reaches the model besides your text: the per-user fields from step 1 are appended as a <user_agent_config> block below your prompt.
Step 3 – Knowledge
Give the agent material of its own.
- Files – documents the agent can search in every conversation. Upload sources that rarely change: handbooks, policies, price lists. Wait until a file reaches the Ready state, otherwise the agent answers without it. See Knowledge files.
- Context document – a single AGENT.md the agent reads in full on every turn. Short, durable facts belong here; long texts belong in files. See Context files.
The Workspace Assistant needs neither, so you can pass straight through this step.
Step 4 – Tools
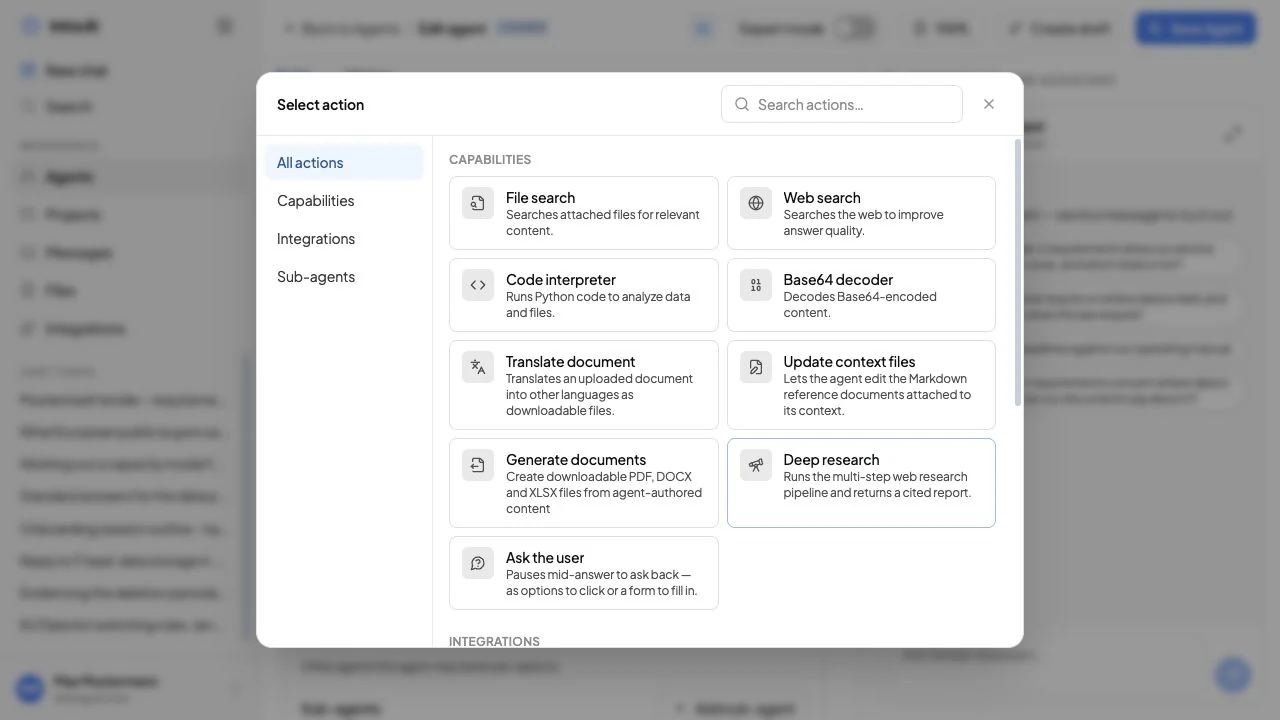
Open the action picker and grant only what the job needs. Actions are grouped in three categories:
- Capabilities – built-in tools (web search, file search, code interpreter, document generation, and more)
- Integrations – connected external services your workspace has set up
- Sub-agents – other agents this one may hand sub-tasks to
For the Workspace Assistant, add Web search so it can retrieve current information.
The Actions picker with Capabilities, Integrations, and Sub-Agents
Step 5 – Model
Choose the model this agent always answers with. The list shows only the models your administrator has configured, and the choice is pinned: people chatting with the agent cannot switch it.
Which further controls appear depends on what the selected model actually supports:
| Control | Appears when |
|---|---|
| Thinking on/off | The model can be told not to reason |
| Reasoning effort (Low / Medium / High) | The model honours graded effort |
If you see neither, the selected model has no thinking controls. Expert mode adds creativity (temperature), maximum answer length and top-p.
Tip: Users can override the reasoning level for a single turn with the Think control in the message composer, without changing the agent's stored setting.
Step 6 – Team
Decide who the agent is for:
| Option | Who can access it |
|---|---|
| Private | Only you, plus anyone you explicitly add as a member |
| Admin (global) | Every user in your workspace (only administrators can set this) |
| Internal | Administrators only; useful for specialist sub-agents that should not appear in the main picker |
For a personal assistant, keep it Private for now. Members you add here gain access when you finish the agent in step 7.
Step 7 – Overview
The last step summarises everything: identity, instructions, knowledge, tools, model and visibility, each with a Change link back to its step. Checks that still fail are listed here.
The primary action on this step finishes the agent. Until you use it the agent stays a draft visible to you alone; afterwards it appears on the Agents page under My Agents and is available to whoever step 6 named.
Testing while you build
From step 2 onward the right-hand column runs your draft as a real chat, so you can try a question before the agent is finished. This costs tokens and runs the real model – it is not a simulation. See Live preview for what the preview leaves out.
Field reference
Identity (step 1)
| Field | What it does | Notes |
|---|---|---|
| Name | How the agent appears everywhere | Required |
| Description | One-sentence summary shown on cards and in the gallery | Optional but recommended |
| Category | Groups the agent in the gallery and drives the default gradient | Optional |
| Icon | Image shown on the card and in the chat header | PNG/JPG/WebP/GIF, up to 10 MB; defaults to a robot icon |
| Thumbnail gradient | Colour band on the agent card | Chosen from a preset palette; auto-derived from category if left blank |
| Conversation starters | Suggested opening questions shown as chips in new conversations | Optional |
| Tags | Short labels for gallery search | Optional |
Instructions (step 2)
The system prompt. Plain text. Define the agent's role, tone, language rules, output format, and any standing restrictions. Use Optimize to improve a rough draft, or one of the three Templates to start from a proven structure.
Input type (step 1)
| Type | What happens |
|---|---|
| Prompt (default) | Standard free-text chat box |
| Form | Chat box replaced with a structured form; see Form agents |
Model and reasoning effort (step 5)
See Model and reasoning effort below.
Actions (step 4)
The tools this agent can call. See Tools and actions below.
Knowledge files (step 3)
Files the agent can search using retrieval (RAG). See Knowledge files below.
User configuration fields (step 1)
Fields each user fills in for themselves to personalise the agent's behaviour without changing the agent itself. See Per-user configuration below.
Visibility and members (step 6)
Who can access the agent. See Visibility and sharing below.
Model and reasoning effort
Each agent is pinned to a single model and provider. The models available depend on your deployment – your administrator decides which ones appear, so there are no fixed model names in this guide.
For models that support extended reasoning, a Reasoning effort dropdown appears:
| Setting | Effect |
|---|---|
| Low | Quick answers, minimal deliberation |
| Medium | A balance of speed and depth |
| High | Deepest reasoning (the default) |
The reasoning effort setting is stored on the agent. It only applies to models that actually support a reasoning channel; on standard models it has no effect.
Tip: The Think control in the message composer lets any user override the reasoning level for a single turn – handy when one question needs extra depth. It does not change the agent's stored setting.
Writing the instructions
The instructions field is the most important field in the builder. Write clearly and specifically. A few principles:
- State the agent's role at the top: "You are a meeting summariser for a legal team."
- Specify the output format: "Always reply with a bullet list of action items followed by a prose summary."
- Set language rules: "Reply in the same language the user writes in."
- State what the agent should not do: "Never speculate about legal advice."
Optimize rewrites your draft into a higher-quality version. The suggestion is shown side by side with your original. Click Accept to replace your draft, or Discard to keep what you had – nothing changes until you decide.
From template opens the prompt template library. Select a template, fill in any {{variable}} prompts the template asks for, then choose to Replace or Append to what is already in the field.
Tools and actions
Tools are called actions in the builder. They let an agent do more than reply with text. Open the action picker (click + Add action) to browse by category.
Built-in capabilities
| Action | What it does | When it is available |
|---|---|---|
| File search | Searches the agent's knowledge files and any documents attached to the conversation (retrieval – the AI searches your files and quotes the relevant bits) | Always, when enabled |
| Web search | Retrieves current information from the web | When your administrator has enabled web search |
| Code interpreter | Writes and runs Python, JavaScript, or bash code in a secure, isolated sandbox | When your administrator has configured the sandbox service |
| Translate document | Translates an attached document into one or more languages while preserving the file format (txt, Markdown, Word) | Always, when enabled |
| Base64 decoder | Decodes Base64-encoded content returned by integrations (e.g. email attachments, file APIs) | Always |
| Update context files | Lets a private agent rewrite its own context files as it works – useful for agents that maintain a living knowledge cache | Only available when the agent's visibility is Private |
Integrations
The Integrations section lists connected external tools available to your workspace (for example, Microsoft Outlook or a document management system). Adding an integration gives the agent access to those tools' actions. The most frequently used integrations are listed first.
Sub-Agents
The Sub-Agents section lets you wire in other agents as workers this agent can delegate to. See Sub-agents below.
Knowledge files
Knowledge files form a permanent searchable library attached to the agent. When a user asks a question, the agent searches the files and quotes the most relevant passages in its answer – this is called retrieval, or RAG.
To add a knowledge file: drag and drop a file onto the knowledge files area, or click the upload button. Files are processed and indexed in the background. A spinning indicator shows while processing; a ready indicator shows when the file can be searched.
Note: If your administrator changes how documents are processed (the chunking strategy), affected knowledge files are marked Stale. A re-embed prompt appears. As the agent owner you can refresh files one at a time or all at once from the builder.
Knowledge files are searched on every turn when the File search action is enabled. They are distinct from context files – context files are injected in full, whereas knowledge files are searched and only the relevant fragments are included in the answer.
Context files
The Knowledge step holds a single AGENT.md context document whose full content is injected into the agent's instructions on every single turn. Unlike knowledge files (which are searched and quoted in fragments), this document is always present – think of it as a fixed knowledge cache the agent always has in front of it.
Use it for short, always-relevant material: a style guide, a glossary, a set of standing rules, a team-specific FAQ. Keep it short. For larger document collections, use knowledge files instead.
You author and edit this AGENT.md document directly in the Knowledge step, in a Markdown editor with an Edit/Preview toggle – the same editor used in the chat composer. Administrators can additionally attach optional per-instance override documents.
Note: A private agent can be given the Update context files action, which lets the agent rewrite its own AGENT.md while it works. This self-editing capability is only available when the agent's visibility is set to Private.
Visibility and sharing
Visibility tiers
| Visibility | Who can use it |
|---|---|
| Private | Only you, plus anyone you explicitly add as a member |
| Admin (global) | Everyone in your workspace (set by administrators) |
| Internal | Administrators only; the agent is hidden from all standard pickers and the gallery |
Note: When you create a new agent, it starts as Private. Only administrators can set an agent to Admin (global) or Internal.
Adding members to a private agent
When you share a private agent with colleagues, each person gets one of two roles:
| Role | What they can do |
|---|---|
| Member (read-only) | Open the agent, see its full configuration in the builder, and start conversations with it – but not save changes |
| Admin (editor) | Everything a member can do, plus save changes to the agent |
The owner always has full control, including deleting the agent and changing member roles. A member may remove themselves from an agent, but the owner cannot remove themselves.
Config agents (read-only)
Agents that came from the instance configuration file carry a Config badge in the builder. Every field is read-only, and a banner says so at the top of the pipeline. These agents are managed by your administrator and are reloaded whenever the server restarts.
Sub-agents (master–worker)
An agent can delegate parts of a task to other agents wired in as sub-agents. The agent that delegates is the master; the agents it calls are workers. Each sub-agent appears in the master's action list as its own callable tool.
Sub-agents are particularly useful when a task has distinct specialist steps – for example, a "Meeting Summariser" agent could delegate to a "Translator" sub-agent for multilingual output, and to an "Action Item Extractor" sub-agent to produce a structured task list.
How sub-agent calls work
- The master sends a free-text prompt to each sub-agent it calls.
- Sub-agents have no memory of the master's conversation history – the master must include all needed context in the prompt it writes.
- Sub-agents can run in parallel within a single turn.
- They are capped per turn – by default, five calls per turn, adjustable under Expert mode in the Tools step.
- Sub-agents return plain text, which the master incorporates into its final reply.
- Nesting goes two levels deep: a sub-agent can call specialists of its own. At the second level those specialists are read-only – write tools are not permitted there.
In the conversation
Each sub-agent run appears as a collapsible step card inline in the assistant's message, showing:
- The sub-agent's name (or its display name if the owner set one)
- Running / done status
- Token count and duration
Expand a card to see the master's prompt to the sub-agent and the sub-agent's full output.
Adding sub-agents in the builder
- In the General tab, click + Add action.
- Switch to the Sub-Agents category in the action picker.
- Select the agent you want to wire in as a worker.
- The sub-agent appears in the actions list. Click its row to configure a usage hint (tells the master when to call it), a display name (shown in the transcript card), and optional model parameter overrides for calls through this master.
Deleting a sub-agent
If you try to delete an agent that is currently wired in as a sub-agent of another agent, a warning dialog lists the master agents that reference it. You can:
- Cancel and remove the sub-agent from the master agents first, or
- Choose Delete anyway to force-delete – the affected master agents will mark the slot as broken until you update them.
The internal visibility tier
Set an agent's visibility to Internal to make it a building-block agent that can only be called as a sub-agent. It never appears in the main agent picker and cannot be started in a standalone conversation.
Form agents
By default an agent uses a free-text chat box. Set the Input type to Form and the chat box is replaced with a structured form. This is useful when you want consistent, complete input every time – for example, a "Meeting Summariser" that always asks for the meeting date, attendees, and raw notes before it begins.
Supported field types
| Field type | Use it for |
|---|---|
| Text | A short single-line answer |
| Long text | A multi-line answer |
| Select | A choice from a fixed list of options |
| Number | A numeric value |
| An email address | |
| Checkbox | A yes/no choice |
| Date | A calendar date |
| File | An uploaded document |
Building a form in the builder
- In the General tab, find the Input type section.
- Switch from Prompt to Form.
- A Form fields editor appears. Click + Add field to add each field.
- For each field, set its label, type, and whether it is required.
- For Select fields, add the list of options.
- The live preview in the right column updates immediately to show the form as users will see it.
When someone fills in the form and clicks Submit, their answers are compiled into the first message and processed exactly like any other agent conversation. Form agents open on their own dedicated run page.
Per-user configuration
Some agents need each user to supply their own details – for example, an email assistant that needs each person's email signature, or a support agent that needs each person's preferred language.
User configuration fields let the agent declare these inputs. Each user fills in their own values, and those values are injected into their version of the agent's system prompt on every turn – without changing anything for other users.
Field types available for user config
| Type | Widget shown to the user |
|---|---|
| Text | Single-line input |
| Textarea | Multi-line plain text |
| Markdown | Markdown editor with preview |
| HTML | HTML editor with sanitised preview |
| Documents | File picker and inline upload |
How users fill in their config
A gear icon icon in the chat composer toolbar opens the user config panel. The icon changes colour to show the fill state:
- Amber – fields exist but some are not yet filled
- Green – all fields are filled
- Red – a required field is missing
The same colour badge appears on the agent chip, recent-agent buttons, and @-mention rows in the chat. If someone tries to send a message while a required field is missing, the config panel opens automatically and sending is blocked until the field is saved.
Template gallery and cloning
Any agent owner can submit their agent to the template gallery for review. Once an administrator approves it, the template appears in the Templates tab of the Agents page, where anyone in the workspace can:
- Browse it and read its full configuration
- Run it directly without cloning
- Clone it to create their own private copy
Cloning makes a deep copy of the template's runnable configuration – including its sub-agent team – owned by you. The clone starts as a private draft with no template status, so you can adapt it freely without affecting the original. If a sub-agent in the template is one you already have access to, it is kept by reference; otherwise it is deep-copied too.
To submit an agent as a template, open the agent in the builder and, in the General tab's Share as template section, click Submit to template gallery. An administrator reviews and approves or rejects it.
Administrators can also toggle Verified (trust badge) and Featured (sorted first in the gallery) on any approved template.
Live preview
The builder's right-hand column runs your draft as a real chat (or form, for form agents) so you can test the instructions before you finish the agent. Type a message and see how the current configuration responds.
Two things are excluded from the preview:
- Sub-agent calls – sub-agents are not invoked
- Knowledge-base retrieval – knowledge file search is not active
Finish the agent in the Overview step and start a real conversation to exercise those features.
Evaluations tab
The builder header carries up to three tabs: Build (the seven-step pipeline), Evaluations and History. The Evaluations tab lets you build test datasets, run the real agent against them, and review the results – all inside the application without needing external tools.
Note: The Evaluations tab is only shown when your administrator has enabled the evaluation service. If you do not see the tab, it has not been configured for your workspace.
What evaluations do
| Feature | Description |
|---|---|
| Datasets | Author test cases with an input, an expected output, and optionally the expected tools and sub-agents the agent should use |
| Runs | Execute the real agent pipeline against an entire dataset; each item is run, scored, and stored |
| Results | A runs list, latency/cost/quality charts, and a per-item detail view showing input, output, expected output, and scores |
Evaluator types
Each test item is scored by the evaluators enabled for the agent:
| Evaluator | What it scores |
|---|---|
| Tool path | Did the agent call the expected tools and sub-agents? (deterministic check) |
| LLM judge | How well does the answer match the expected output? (AI-scored against an optional custom rubric set by the agent owner) |
| Latency | Wall-clock time taken for the agent's turn |
| Cost | Model cost of the run in tokens |
Running an evaluation
- Open the agent in the builder and click the Evaluations tab.
- Click New dataset and add your test cases (input + expected output).
- Click Run to start an evaluation run.
- The run status updates as each item completes. When done, click the run to see per-item results.
Warning: Evaluation runs use the real agent pipeline and debit your token balance. Each item in the dataset counts as a real agent conversation.
Trace viewer
The detail view for each item shows the agent's input, output, expected output, and scores. A trace graph shows the full call sequence for the run, rendered inside the application – you do not need access to any external observability tool.
Using agents in chat
Once an agent exists, starting a conversation with it is quick:
- Open the command palette (
/in the chat box orCtrl+K/Cmd+K) and type the agent's name, or - Click an agent card on the Agents page, or
- Click an agent tile on the landing page or a project page.
The agents you have used recently appear in the Recently used rail on the Agents page, and as quick-select buttons in the chat composer.
When an agent is active:
- Every message routes through its instructions, tools, and pinned model.
- The model selector in the message box is locked to the agent's model.
- Any tool calls the agent makes appear as collapsible cards in the message thread.
- If you return to a conversation that was started with an agent, the agent is restored automatically.
Expert mode – limits and RAG settings
The Expert mode switch in the builder header reveals the technical settings that most agents never need. It adds fields to the existing steps; the number of steps stays the same.
Per-turn recursion limit
The recursion limit controls how many tool-call cycles the agent may run per response turn. A response turn is one message from you plus the agent's complete reply; a tool-call cycle is one pass in which the agent calls tools, receives the results and decides what to do next. A higher limit lets the agent do more work per response turn; a lower limit keeps answers faster and cheaper.
| Setting | Notes |
|---|---|
| Recursion limit | Number of tool-call cycles allowed per response turn; capped by the maximum your administrator has set |
RAG chunk strategy (knowledge file settings)
If the agent has knowledge files, you can override how those files are split into searchable pieces for this agent specifically. Leave these blank to use the workspace defaults.
| Setting | What it controls |
|---|---|
| Chunk strategy | How text is split: by character count, by heading, or semantically |
| Chunk size | Approximate size of each piece in tokens |
| Chunk overlap | How much consecutive pieces overlap (as a fraction) |
Note: Changing the chunk strategy only affects files ingested or re-ingested after the change. Existing files are not re-processed automatically – they will be marked Stale and you will be prompted to re-embed them.
Sub-agent limits
When the agent has sub-agents wired in, you can control:
| Setting | Default | What it controls |
|---|---|---|
| Max calls per turn | 5 | How many sub-agent calls the master can make in one response turn |
| Max tokens per turn | 50,000 | Running token total across all sub-agent calls in one response turn |
| Per-call timeout | 180 seconds | Wall-clock time (3 minutes) allowed for each individual sub-agent call |
Troubleshooting
| Symptom | Likely cause | What to do |
|---|---|---|
| The Agents page is not in the sidebar | The agents feature is not enabled for your workspace | Ask your administrator to enable the agents toggle in the interface settings |
| The + New Agent button is missing | Feature not enabled, or you do not have the right role | Confirm the agents feature is on with your administrator |
| The Evaluations tab is not shown | The evaluation service has not been configured | Ask your administrator to enable evaluations in System Config |
| The agent's model selector is locked in chat | Normal – the agent pins a model | To use a different model, start a conversation without selecting an agent |
| A knowledge file is marked Stale | The workspace chunk settings were changed after the file was indexed | Open the agent builder and re-embed the file |
| A sub-agent slot shows as broken | The sub-agent was deleted | Remove the broken slot from the master agent and save |
| The Update context files action is greyed out | The agent's visibility is not Private | Change visibility to Private to enable self-editing context files |
| The live preview does not call sub-agents | By design – the preview skips sub-agents and knowledge retrieval | Finish the agent and test in a real conversation |
| An integration is not in the action picker | The integration has not been connected or approved | Ask your administrator to connect the integration from the admin panel |
| A Config badge agent cannot be edited | Config agents are read-only by design | Ask your administrator to change the agent's definition in the configuration file |
| The gear icon on the agent chip is amber | Your per-user config fields are not fully filled in | Click the gear icon to open the config panel and complete the fields |
Frequently asked questions
Q: Can I use the same agent in multiple projects? A: Yes. Set the agent's visibility to Admin (global) (administrators only) or share it with the relevant people as a Private agent with members. The agent is then accessible to those users regardless of which project they are working in.
Q: What is the difference between knowledge files and context files? A: Knowledge files are searched and only the most relevant passages are included in the answer (retrieval). Context files are always injected in full on every turn, regardless of the question. Use context files for short, always-relevant material (style guides, glossaries); use knowledge files for large document collections.
Q: Can I export or import an agent's configuration? A: Yes. In the builder header, click Import YAML to load a configuration from a YAML file, or use the export option to download the agent as YAML. This is useful for backing up agents or moving them between workspaces. Config agents (with the Config badge) cannot be exported from the UI.
Q: What happens if I delete an agent someone else is using? A: Existing conversations that used the agent are not deleted – their history is preserved. New conversations with that agent are no longer possible.
Q: Can an agent call itself as a sub-agent? A: No. Circular sub-agent references are blocked when you save the agent configuration.
Q: Why is the model selector locked when I chat with an agent? A: Agents pin a specific model so their behaviour is consistent. The agent owner chose the model in the builder. If you need a different model, start a plain chat without selecting an agent.
Q: Can I try an agent from the template gallery without cloning it? A: Yes. In the Templates tab, click a template to open its details, then click Chat with agent to start a conversation with it directly. Choose Use as template only if you want to clone it into your private agents and customise it.
Q: How many sub-agents can a master agent have? A: There is no fixed limit on how many sub-agents you wire in. There is a per-turn call cap (default 5) and a per-turn token cap (default 50,000 tokens) to prevent runaway fan-out. Both are adjustable under Expert mode in the Tools step.
Q: Why do I see a gear icon on the agent chip? A: The agent has per-user configuration fields – inputs specific to you, like your email signature or a preferred language. Click the gear icon to fill in your values. A required field that is not filled will block you from sending messages until it is completed.
Q: Who can approve template gallery submissions? A: Only administrators can approve or reject template submissions. After you submit an agent, an administrator reviews it and approves it to make it visible in the gallery for everyone.
Related: Chatting · Tools & MCP · Document Generation · Projects · Files & Knowledge · Integrations · Settings