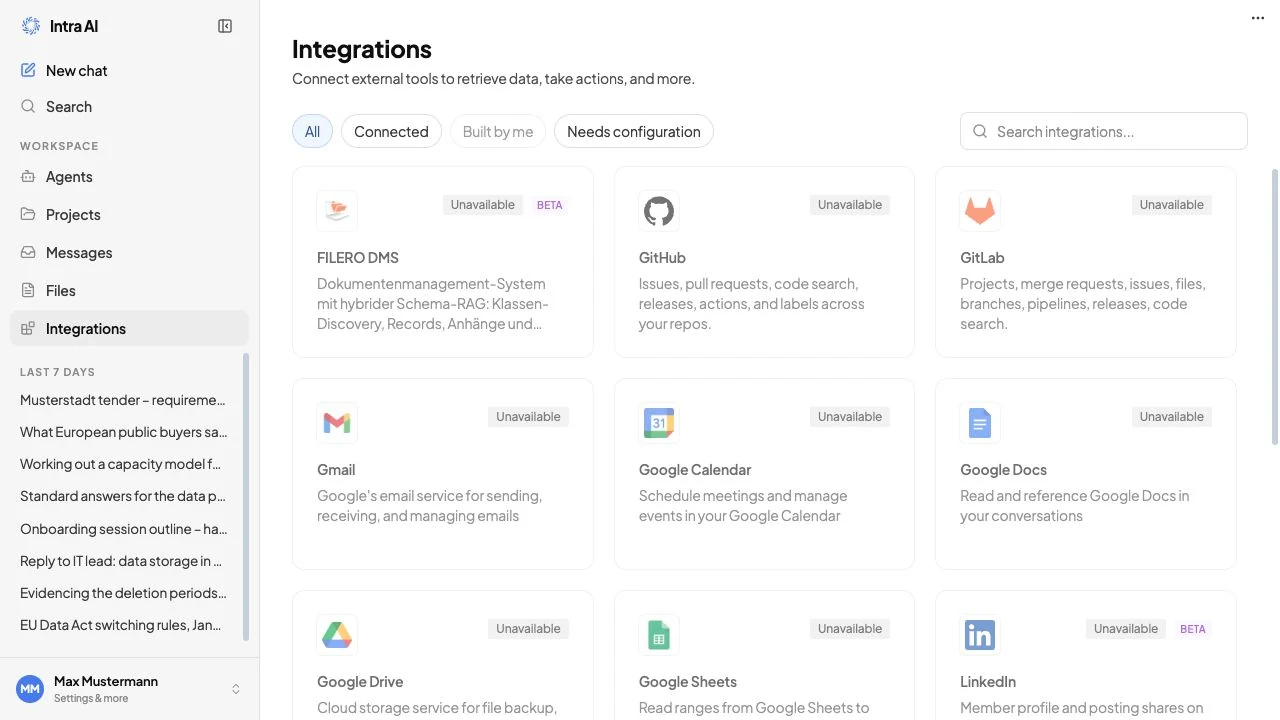
Integrations
Integrations connect Intra AI to the tools you already use – your email, calendar, files, code repositories, and document systems. Once you link an account, agents can act on your behalf in those tools: reading your messages, searching your files, opening pull requests, creating calendar events, and more. Every action is scoped to your own account; no other user's data is accessible.
At a glance: Open Integrations in the navigation, click a connector tile, then click Add connection to authorise your account.
What integrations are
An integration is a bridge between Intra AI and an external service. After you connect your account, agents that have been configured to use that service gain a set of tools – specific actions like "search my email" or "create a pull request". The agent uses those tools automatically when you ask it something that requires them; you do not need to invoke them manually.
Integrations are personal. Each user connects their own account. When an agent acts on your behalf, it uses your credentials – your inbox, your repositories, your files – never a shared pool.
The Integrations feature must be enabled by your administrator. If you do not see Integrations in the navigation, ask your administrator to turn it on.
The Integrations Hub
The Integrations Hub is the central catalogue where you browse and manage every connector available to your workspace. Open it by clicking Integrations in the left-hand navigation.
The Integrations Hub catalogue grid with status filter chips
The hub shows a grid of tiles – one per connector. Each tile displays the connector's logo, name, a short description, and a status badge showing whether it is connected, available to connect, or waiting for administrator configuration.
Searching and filtering
At the top of the hub you will find a search bar and four filter chips:
| Filter | What it shows |
|---|---|
| All | Every connector your administrator has enabled |
| Connected | Connectors you have already linked to an account |
| Needs configuration | Connectors your administrator has not yet finished setting up |
| Built by me | Coming soon – reserved for custom connectors |
Type in the search bar to narrow the grid by connector name, vendor, or description. The grid updates as you type.
Note: Only connectors your administrator has enabled appear in the hub. Connectors that have been turned off are hidden completely. The set of tiles you see may differ from a colleague's view.
Connecting your account – step by step
This walkthrough uses the Google integration as an example. Other OAuth-based connectors (Microsoft, GitHub, GitLab) follow the same pattern.
-
Click the Google Workspace tile. You are taken to the connector's detail page, which shows a description, the list of actions the connector enables, and a Connections panel.
-
In the Connections panel, click Add connection. If this is your first time connecting, you will see a "No connections yet" placeholder before you click.
-
You are sent to Google's sign-in page in the same tab. Sign in with the Google account you want to link to Intra AI.
-
Google shows a consent screen listing the permissions Intra AI is requesting. Review them and click Allow (or the equivalent button for your provider).
-
You are returned to the Intra AI Integrations Hub. A success banner confirms the connection, and your account now appears in the Connections panel on the connector's detail page.
Note: You must complete the consent screen within ten minutes. If you take longer, the authorisation attempt expires and you will see an error. Click Add connection again to start a fresh attempt.
Connecting a second account
Microsoft is currently the only connector that supports connecting more than one account – for example, a work account and a second tenant. Repeat the steps above and sign in with the second account when Microsoft's consent screen appears. Both accounts then appear in the Connections panel. The other OAuth connectors (Google, GitHub, GitLab) store a single account – reconnecting replaces the existing credential rather than adding a second row.
The Connections panel
Every connector detail page has a Connections panel. Each row in the panel represents one connected account.
| Element | What it means |
|---|---|
| Account name or email | The identity of the connected account |
| Refreshed X ago | When the connection's access token was last renewed automatically |
| Default badge | This account is used by agents unless you specify otherwise |
| Set as default button | Marks this account as the default; appears when the account is not already the default |
| Disconnect button | Removes the account from Intra AI (see Disconnecting below) |
Tip: If you have only one account connected, it is used automatically. Because Microsoft is the only connector that supports multiple accounts, the Set as default and account-switching options appear only for Microsoft, and only when you have two or more Microsoft accounts connected.
When a connection expires
Access tokens renew automatically in the background. If automatic renewal fails (for example, because you changed your password at the provider), Intra AI will prompt you to sign in again. Re-authenticate using the Add connection flow, then resend your message – the agent will pick up the refreshed connection.
For FILERO, connections can also expire mid-conversation (see the FILERO section below for details).
Choosing an account in chat (Microsoft)
When a Microsoft-enabled agent is active in a conversation and you have two or more Microsoft accounts connected, an account chip appears in the chat composer, just above the message input. The chip shows the email address of the currently active account.
- Click the chip to open a dropdown listing all your connected Microsoft accounts.
- Select the account you want the agent to act on for the rest of this conversation.
- The chip updates to show the selected account's email address.
- You can switch accounts at any point during the conversation.
Note: The account chip appears only when the agent's tools include Microsoft actions (email, calendar, Teams, or SharePoint) AND you have two or more Microsoft accounts connected. With only one Microsoft account the chip is still visible but shows the account name without a dropdown.
Pinning a default account in an agent (Microsoft)
If you own a private agent that uses Microsoft tools, you can pin a default account for that agent so the right mailbox is pre-selected whenever that agent runs.
- Open the Agent Builder for your private agent.
- Scroll to the Account section. This section appears only when the agent has Microsoft tools and you have more than one Microsoft account connected.
- Select the account you want this agent to use by default, or leave it on Let the user pick so each conversation starts from the account chip instead.
- Save the agent.
Note: The default-account setting is available only while the agent is private to you. Once you share the agent with other members of your workspace, the pinned account no longer applies – each member uses their own connected account, controlled via the account chip in chat.
Available integrations
The connectors below ship with Intra AI. Which ones appear in your hub depends on what your administrator has enabled and configured.
Google Workspace
Connect once with your Google account to give agents access across the Google suite. A single sign-in covers all five services.
| Service | What agents can do |
|---|---|
| Gmail | Read messages, search your inbox, work with email |
| Google Calendar | View events, create and manage calendar entries |
| Google Drive | Find files and read their metadata – file contents cannot currently be opened |
| Google Docs | Read Google Docs documents as text |
| Google Sheets | Read cell ranges from spreadsheets |
Note: Upload documents you want the AI to work with via Files.
Shown when: your administrator has enabled the Google Workspace connector and configured the OAuth client (Client ID and Client Secret) in the admin panel.
Microsoft 365
Connect once with your Microsoft account to give agents access across the Microsoft 365 suite. A single sign-in covers all four services.
| Service | What agents can do |
|---|---|
| Outlook Email | Read messages, search your inbox, send email, manage contacts and folders |
| Outlook Calendar | View, create, and manage calendar events; find meeting rooms |
| Microsoft Teams | Read and send chat and channel messages, manage online meetings |
| SharePoint | Read and write SharePoint sites, lists, list items, files, and pages |
Note: All four Microsoft services share one connection. Connecting to any one of them (for example, Outlook Email) simultaneously enables the others. Disconnecting one removes the shared connection for all four.
Shown when: your administrator has enabled the Microsoft connector and completed the Azure App Registration setup in the admin panel.
GitHub
Connect your GitHub account to let agents work with your repositories. The GitHub integration provides 29 tools spanning repositories, issues, pull requests, code search, releases, Actions workflow runs, and user identity.
| Category | What agents can do |
|---|---|
| Repositories | List repos, read files, browse branches, search code |
| Issues | Create, read, and update issues |
| Pull requests | Open, read, and comment on pull requests |
| Releases | List and read release notes |
| Actions | Read workflow runs and their logs |
Shown when: your administrator has enabled the GitHub connector and configured the GitHub OAuth Application credentials in the admin panel.
GitLab
Connect your GitLab account – gitlab.com or a self-hosted instance – to let agents work with your projects. Your administrator sets the GitLab base URL, so the connector works the same way whether your team uses gitlab.com or an internal server. The GitLab integration provides 30 tools.
| Category | What agents can do |
|---|---|
| Projects | List and inspect projects |
| Repository | Browse files, compare branches, read commits and diffs |
| Issues | Create, read, update, and comment on issues |
| Merge requests | Open, read, review, and list merge requests |
| Pipelines | View pipeline results, list runs, retry a pipeline |
| Releases and tags | List releases, tags, and labels |
| Code search | Search across project files |
Shown when: your administrator has enabled the GitLab connector and configured the OAuth Application credentials (and optionally the base URL for self-hosted instances) in the admin panel.
MCP Utilities
A set of always-available helpers that agents can use without any connection from you. They provide date and time calculations, maths, text encoding, and unique ID generation.
Because MCP Utilities require no user account, they are ready to use as soon as your administrator enables them. No Add connection step is needed.
FILERO document management
FILERO (by LIB-IT DMS GmbH) connects Intra AI to a FILERO Document Management System. The integration is provided through the Contiss cooperation. It is set up through a four-step wizard rather than a single OAuth flow, because FILERO uses its own username-and-password authentication.
See the FILERO document management section below for the full walkthrough.
FILERO document management
FILERO connects through a guided four-step wizard. Open it by clicking the FILERO tile in the Integrations Hub, then clicking Connect.
Step 1 – Instance
Enter the URL of your FILERO instance (for example, https://lwk.filero.de). Intra AI validates that the URL is reachable and is an allowed FILERO host. If the URL is rejected, contact your administrator – the allowed host list is controlled by your deployment configuration.
Step 2 – Credentials
Enter your FILERO username and password. Intra AI sends these directly to your FILERO instance to verify them and obtain an access token. If your instance requires a second factor (a one-time code from an authenticator app), you will be prompted for that too after submitting your username and password.
Step 3 – Schema
After authenticating, Intra AI loads the list of document classes available in your FILERO instance. Review the classes and select the ones you want agents to be able to search and retrieve. If your instance has a very large number of classes, you can use the search box within the list, or leave the selection empty to include everything.
Note: If your instance has more than 5,000 document classes, the wizard shows the first 5,000 and indicates how many were omitted. You can still proceed – the indexer will process the full set.
Step 4 – Indexing
Once you approve the class selection, Intra AI indexes the selected document classes so agents can search them. A progress indicator shows per-class completion. Indexing runs in the background; you can close the wizard and return to check progress later via the FILERO overview page.
The overview page (accessible from the FILERO tile after connecting) shows:
- Number of classes indexed
- Total attributes indexed
- Date of the last index run
After connecting FILERO
Once indexing is complete, agents that have FILERO tools can search and retrieve your document records using plain-language queries. For example: "Find all partner records with turnover over €10 million" or "Pull the latest invoice for Müller GmbH."
Read and search tools include:
| Tool | What it does |
|---|---|
| Search schema | Discover which document class to query for a given topic |
| List classes | See all available class names |
| Get class attributes | Inspect the fields available in a specific class |
| Advanced search | Filter, sort, and paginate records in a class |
| Get record | Retrieve a single record by ID |
| Get records batch | Retrieve multiple records at once |
| List children | Navigate record hierarchies |
| Download document | Retrieve an attached file (PDF, scan, etc.) |
FILERO write actions
Beyond search and retrieval, a FILERO agent can also write: create, update, move, circulate and delete records, and upload, replace or remove documents. Which of these an individual agent may call is set by its author in the Agent Builder – an agent with no write tools cannot change anything.
The most far-reaching actions – deleting, moving, overwriting fields and document content, and sending messages – are shown to you as a confirmation card in the chat before they run, and execute only after you approve. Other write actions, such as creating a record or uploading a document, run without a prompt. Every action is written to the audit log.
FILERO session expiry
FILERO sessions expire after approximately 20 minutes. Intra AI attempts to renew the session silently. If renewal fails (for example, because your FILERO password was changed), a sign-in prompt appears in the chat. Enter your credentials and then resend your last message.
You can also reconnect manually at any time via Settings → Integrations → FILERO and clicking Sign in again.
Note: Your administrator controls which FILERO instance URLs are permitted. If your instance URL is rejected during the wizard's Instance step, ask your administrator to add the host to the allowed list.
How integration tools reach agents
Connecting an integration does not automatically give every agent access to it. An agent's author must explicitly add the integration's tools to that agent in the Agent Builder. When you start a conversation with an agent that has integration tools configured, those tools are available for the agent to use.
The flow works like this:
- You start a conversation and select an agent that has, for example, Microsoft Outlook tools enabled.
- At the start of the conversation, Intra AI checks whether you have a connected Microsoft account. If you do not, you will be prompted to connect one before the agent can run.
- For each message you send, the agent decides which tools to use. When it calls an Outlook tool, Intra AI automatically supplies your personal access token to the tool – you never need to copy credentials manually.
- The tool's result (emails found, event created, etc.) is returned to the agent, which incorporates it into its answer.
Note: Agents act on your behalf using your own connected account. An agent cannot access another user's account, even if that user has also connected the same integration.
Admin enablement
Your administrator controls which integrations are visible in the hub. The admin panel's Integrations tab (under Admin → Integrations) lists every connector grouped by vendor. Each row has a toggle switch:
| Toggle state | What users see |
|---|---|
| On (default for ready connectors) | Tile appears in the hub; users can connect |
| Off | Tile is hidden from users entirely |
Administrators also see status badges on each row:
| Badge | Meaning |
|---|---|
| Runtime ready | The underlying plugin is loaded and healthy |
| Runtime missing | The plugin is not yet loaded on this deployment |
| OAuth set | The OAuth client credentials (Client ID and Secret) have been entered |
| OAuth missing | OAuth credentials are still needed before users can connect |
For Google and Microsoft, clicking the row in the admin panel expands an inline form where the administrator can enter the OAuth client credentials without leaving the page.
Every toggle change is recorded in the admin Audit Log with the administrator's identity, the affected connector, and the new state.
Shown when: you are signed in as an administrator and navigate to Admin → Integrations.
Security and data access
Intra AI is designed so that your credentials are isolated from all other users:
- Encrypted at rest. All stored credentials (OAuth tokens, FILERO session tokens) are encrypted in the database. A separate encryption key – never stored alongside the data – is required to decrypt them.
- Per-user isolation. Credentials are stored keyed to your user account. No other user can use your credentials to call integration tools.
- Scoped permissions. OAuth connections request only the permissions needed for the tools the connector offers. For example, the GitHub connector does not request permission to delete repositories or administer organisations.
- You authorise via the provider. When you connect an account, you log in at the provider's own website (Google, Microsoft, GitHub, GitLab). Intra AI never sees your password for those services – only the access token the provider issues after you consent.
- Actions as your account. When an agent calls an integration tool, it acts using your personal access token. Results are what you would see if you performed the same action yourself – nothing more.
- Your administrator controls which integrations are available, but cannot use the credentials you store for them.
Disconnecting an account
To remove a connected account:
- Open Integrations in the navigation.
- Click the tile for the connector you want to disconnect from.
- In the Connections panel, find the account row and click Disconnect.
- A confirmation dialog appears. Click Disconnect to confirm.
The account is removed from Intra AI. For GitHub and GitLab, the access token is also revoked at the provider, so the connection is fully terminated on both sides. For Google and Microsoft, Intra AI removes the stored token from its own database but does not call a provider-side revoke endpoint – the token remains valid at the provider until it expires. (Google users can revoke access manually at myaccount.google.com; Microsoft/Entra tokens expire on their own.)
Warning: Disconnecting a Microsoft account removes the shared connection for all Microsoft 365 services (Outlook Email, Calendar, Teams, and SharePoint) simultaneously.
After disconnecting, any agent that relied on that integration will prompt you to reconnect the next time you use it.
Troubleshooting
| Symptom | Likely cause | What to do |
|---|---|---|
| Integrations does not appear in the navigation | The Integrations feature is turned off for your workspace | Ask your administrator to enable it under Admin → System Config → Features (toggle Integrations) |
| A tile I expected is missing | Administrator has disabled it or not finished configuring it | Ask your administrator; if you are the admin, go to Admin → Integrations and turn it on |
| Clicking Add connection does nothing or shows an immediate error | OAuth client credentials are not configured | Administrator must enter the Client ID and Client Secret for this connector in the admin panel |
| Provider consent screen shows a redirect URI error | The callback URL in the provider's app settings does not match | Administrator must update the "Authorisation callback URL" in the provider's OAuth app to match exactly |
| Agent says it cannot access my data even though I am connected | The agent does not have integration tools added | The agent's author must add the relevant actions in the Agent Builder – connecting your account alone is not enough |
| Connection shows "Refreshed X days ago" and errors are occurring | Token may be stale or revoked | Disconnect and reconnect the account |
| FILERO wizard stuck at step 3 with 0 classes | Indexer sidecar is not running | Contact your administrator to verify the FILERO indexer service is started and healthy |
| FILERO wizard rejects the instance URL | The host is not on the allowed list | Contact your administrator to add your FILERO domain to the deployment configuration |
| Prompted to sign into FILERO again mid-conversation | FILERO session expired and silent renewal failed (e.g. password changed) | Enter your FILERO credentials in the prompt, then resend your message |
| Microsoft tile shows "Connected" but Teams tile shows "Available" | Scope update pending; the new scopes need user consent | Click the Teams tile and follow the Add connection flow; Microsoft will show only the new permissions to approve |
Frequently asked questions
Q: Can I connect the same integration more than once? A: For Microsoft, yes. You can connect multiple Microsoft accounts – for example, from different tenants – and each appears as a separate row in the Connections panel; use the Set as default button to choose which one agents use unless you specify otherwise. The other OAuth connectors (Google, GitHub, GitLab) hold a single account – reconnecting replaces it rather than adding a second row.
Q: Can two users share one connected account? A: No. Integrations are personal. Each user connects their own account. An agent acting on your behalf always uses your own credentials.
Q: If I disconnect an account, does Intra AI delete my data? A: Disconnecting removes the stored access token and any cached credentials from Intra AI's database. For GitHub and GitLab, the token is also revoked at the provider; for Google and Microsoft it is removed only from Intra AI's database and stays valid at the provider until it expires. Data already retrieved and used in conversations remains in those conversations, but the agent can no longer access new data from the disconnected account.
Q: Can agents take actions I did not explicitly ask for? A: Agents only call integration tools in response to your messages. They do not run in the background or take actions autonomously without a conversation being active.
Q: Which agents have integration tools enabled? A: Open the Agents page and click an agent to see its detail page. The Actions section lists which integration tools that agent has. Agents your administrator has published – such as "Workspace Assistant" or "Email Assistant" – typically show their tool list there.
Q: I have two Microsoft accounts connected. How does the agent know which one to use? A: The agent uses the account shown in the account chip in the chat composer. If the chip shows the wrong account, click it to switch before sending your message. You can also pin a preferred account for private agents in the Agent Builder (see the Pinning section above).
Related: AI Agents · Chatting · Files & Knowledge · Settings