Files & Knowledge
Your files are the knowledge Intra AI draws on when it answers. Upload a document and Intra AI extracts its text, makes it searchable, and pulls the most relevant passages into your conversations – with sources you can click to verify.
Think of it like giving the AI a reference library. When you ask a question, the AI searches your files and quotes the relevant parts rather than relying solely on what it was trained on. This is called retrieval (or RAG – Retrieval-Augmented Generation), and it means answers are grounded in your actual documents.
At a glance: Open Files in the left sidebar to upload and manage documents. Attach a file to a conversation via the + (add) button in the message composer.
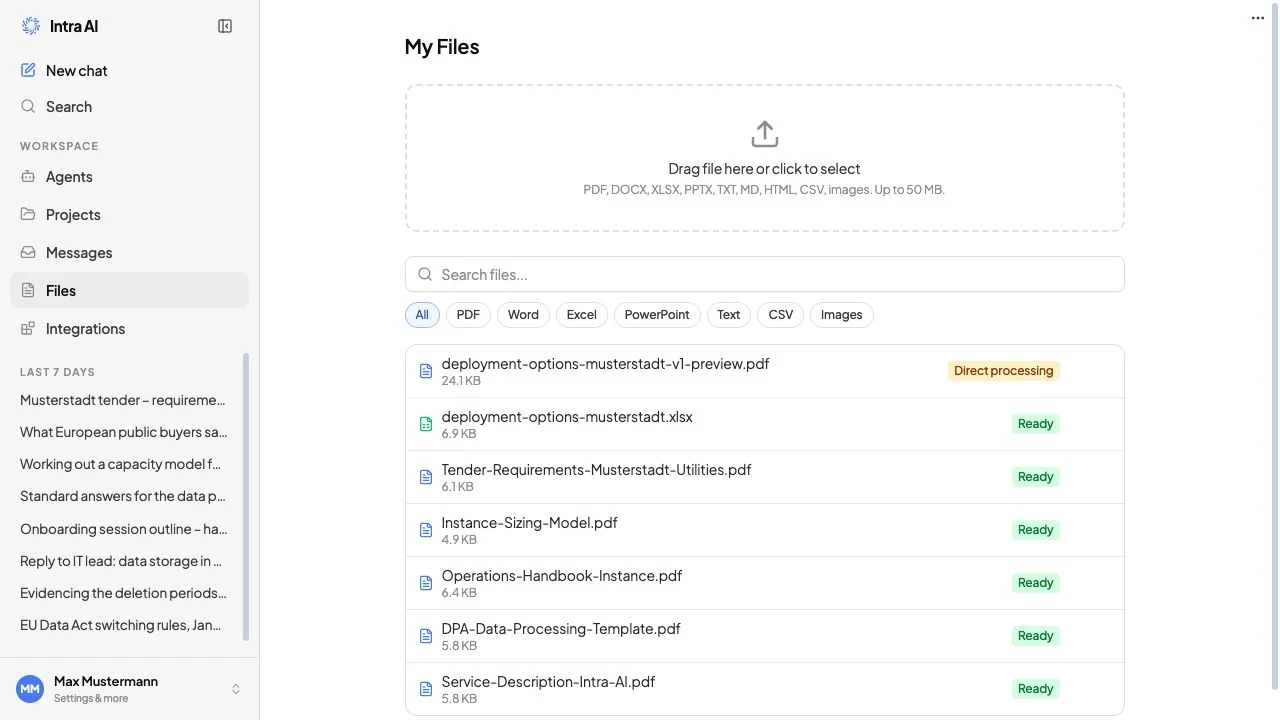
The Files library with type-filter buttons, search box, and status badges
What the Files area is
The Files area is your personal document library inside Intra AI. Everything you upload here belongs to you by default – your colleagues cannot see your files unless you add them to a shared project.
You use files in two ways:
- Attached to a conversation – the AI reads those files when answering your messages.
- Added to a project – every member of that project can ask questions against the shared document pool.
The Files page is where you upload, search, filter, preview, translate, and delete your documents. It is available when your administrator has enabled file uploads for your workspace.
Supported file types and size limits
Intra AI accepts the following file types. Anything outside this list is rejected, even if the file is renamed to disguise it – the server checks both the filename extension and the actual file contents.
| Category | Accepted extensions |
|---|---|
| Documents | .pdf, .docx, .xlsx, .pptx |
| Text | .txt, .md, .csv |
.eml, .msg | |
| Images | .jpg / .jpeg, .png, .webp, .gif, .tiff |
Not accepted: the older binary Office formats (.doc, .xls, .ppt), OpenDocument (.odt), SVG, HTML (.html), ZIP, and any other type not listed above.
Size limit: each file can be up to 50 MB by default. Your administrator can raise or lower this limit for your workspace. If your file exceeds the limit, the upload is rejected immediately with a message showing the actual file size and the current limit.
Note: Every upload is re-checked on the server – both the declared file extension and the actual file contents. HTML and SVG files are rejected outright. Renaming a file makes no difference, because the check is based on the contents.
How to upload a file
- Open Files in the left sidebar.
- You will see the upload zone – a dashed rectangle near the top of the page.
- Drag a file from your computer onto that zone, or click the zone to open the file picker. You can select multiple files at once.
- A progress bar appears for each file while it uploads.
- Once the upload finishes, the file appears in the list below with a blue Processing badge. Text extraction runs in the background – you do not need to wait.
- After a few seconds the badge changes to green Ready. The file is now searchable and can be attached to conversations.
Tip: You can keep chatting or working in other parts of the app while files process. The status badge updates automatically.
Note: If your administrator has turned off uploads for your workspace, the upload zone still appears on the Files page and the translate icon still shows, but any upload or translation is rejected by the server with a 403 (feature disabled) error. The control that actually disappears is the attach button in the chat composer.
What happens after you upload
Uploading a file kicks off a pipeline that runs automatically in the background.
Step 1 – Storage
The file is stored securely in the object store. Every file is encrypted at rest with a key tied to your account. You do not need to do anything.
Step 2 – Text extraction
The system reads the text out of your file so it can be searched. Different file types go through different extractors:
- PDF and image files use a three-tier process (see below).
- DOCX, PPTX, XLSX – dedicated parsers read the document structure, including tables.
- TXT, Markdown, CSV, EML, MSG – text is read directly.
Three-tier extraction for PDFs and images:
The system tries each method in order and uses the first one that produces good-quality text:
| Tier | What it does | When it is used |
|---|---|---|
| Text | Reads the document's own text layer directly. | Digital PDFs that were not scanned. Fastest and most accurate. |
| OCR | Runs optical character recognition on a rendered image of the page. | Scanned pages with no text layer. Only accepted when the result passes a quality check (enough characters, acceptable confidence). |
| Vision | Sends the page image to a vision-capable AI model to describe its contents. | When text and OCR both fail. Only available when your administrator has configured a vision-capable model. |
For PDFs, this process runs per page. A single document may use different tiers for different pages – for example, seven digital pages use the text tier and two scanned pages fall back to OCR. The badge tooltip shows this breakdown once processing is complete.
Step 3 – Chunking and embedding
After extraction, the text is split into chunks (passages). Each chunk is converted into a mathematical representation called an embedding – a way of encoding meaning that lets the system find passages similar to what you are asking, even if you use different words. Chunks and their embeddings are stored in the vector database.
Step 4 – Ready
The file's status changes to Ready. It is now searchable and will be included when you attach it to a conversation.
Status badges
Every file in the list shows a badge indicating where it is in the pipeline.
| Badge | Colour | Searchable? | Meaning |
|---|---|---|---|
| Processing | Blue (pulsing) | No | Text extraction and embedding are running. |
| Ready | Green | Yes | Fully processed. Click the file to preview it. |
| Direct processing | Amber | No | This file belongs to an agent that reads it directly, without searching. |
| Error | Red | No | Processing failed. See the hint below the file row. |
Hover over a Ready badge (on a PDF or image file) to see the extraction tier breakdown – for example, "12 pages: 9 text · 2 ocr · 1 vision". On other file types the tooltip confirms the file is processed and searchable.
Hover over an Error badge to see an actionable hint explaining why extraction failed and what to do.
Error codes and what to do
| Error hint | What it means | What to do |
|---|---|---|
| No text could be extracted – vision model needed | The document is a scanned image PDF with no text layer, and no vision model is configured. | Ask your administrator to enable a vision-capable model under Admin → AI Providers, then re-upload the file. |
| No extractable text | Every extraction method was tried and found nothing usable. | The file may contain only non-text content. Try a different file or format. |
| Vision provider failed | The vision model returned an error. | Try uploading again. If the problem persists, contact your administrator. |
| Embedding dimension mismatch | The AI model used for embeddings was changed in a way incompatible with the existing index. | Contact your administrator – the index needs to be rebuilt. |
| Semantic embedding failed | The semantic chunking pass could not reach the embedding service. | Try re-uploading the file, or ask your administrator to switch the chunking strategy to "Character". |
| Processing failed | A catch-all for other parser or upload errors. | Check the error detail shown below the file row, then try re-uploading. |
Searching and filtering your files
Once you have uploaded files, a search box and filter chips appear above the list.
- Type in the search box to filter files by filename.
- Click a type filter chip to show only files of that category. The available filters are: All, PDF, Word, Excel, PowerPoint, Text, CSV, Images. The active filter is highlighted in blue.
Both filters work together: you can type "report" in the search box while the PDF filter is active to find only PDF files whose names contain "report".
How files power answers (retrieval)
When you send a message in a conversation that has files attached, Intra AI does the following automatically – you do not need to trigger it:
- Gathers the file pool. It combines the files you attached directly to this conversation, any files belonging to the active project, and any files the active agent carries as knowledge.
- Chooses a retrieval mode.
- Full-context mode – if the total file content is small (under 200 KB by default), the entire content is included in the AI's context in document order. This gives the AI a complete picture and is ideal for translation, full summarisation, or careful document analysis.
- Semantic search mode – if the total is larger, the system finds the most relevant passages by comparing the meaning of your question to the meaning of every stored chunk. The top matches are reranked and the best passages are included.
- Injects the context. The selected passages are added to the AI's prompt in a structured format, labelled with their file name, section heading, and page number so the AI knows exactly where each passage came from.
- Generates the answer. The AI answers using your passages as its primary source and cites where each fact came from.
This all happens in under a second for most files.
Citations – seeing where the answer came from
After an answer that drew on file content, a collapsible Sources bar appears below the reply. Click it to expand the list. Each entry represents one source document and shows:
| Detail | Meaning |
|---|---|
| Filename | The document the passage came from. |
| Section heading | The heading path within the document (e.g. "Results › Revenue"), when available. |
| Page number | The page the passage is on (PDFs only). |
| Relevance score | A number showing how closely the passage matched your question. |
| Snippet | A short excerpt of the matched text. |
| Table badge | Shown when the passage came from a table in the document. |
Click a source entry to open the in-app file preview. For PDFs, the preview scrolls directly to the cited page.
Attaching a file to a conversation
You can attach a file to any conversation via the + (add) button in the message composer.
- Open or start a conversation.
- Click the + (add) icon in the toolbar at the bottom of the message input. A badge on the icon shows how many files are currently attached.
- A panel opens.
The composer's attach menu open, showing Upload file and Attach existing file
You can:
- Upload a new file directly from the panel – it will be processed and attached to the conversation.
- Attach an existing file from your library – files already in your library appear in the list; click one to attach it.
- Use the search box in the panel to find a specific file by name.
- Send your message as normal. Files remain attached for all future messages in that conversation until you remove them.
To detach a file from a conversation, open the attach panel again and click the × next to the file.
You can also paste an image directly into the message input box to attach it to your current message.
Note: Attaching a file to a conversation does not affect the file in your library. Detaching it from a conversation does not delete it.
Personal vs shared (project) files
Personal files
When you upload a file, it is private by default. Only you can see it, search it, or attach it to conversations. It does not appear in your colleagues' file libraries.
Project files
When you add a file to a Project, it becomes part of that project's shared knowledge base. Every member of the project can ask questions against those files and see the citations. The file is never shown to users outside that project, and it does not appear in your personal chats outside the project context.
Adding a file to a project happens from within the project's Files tab, not from the main Files page.
Note: Detaching a file from a project does not delete the file. It returns to your personal library.
Agent knowledge files
Agents can carry their own set of knowledge files – documents the agent always searches when it runs, regardless of which conversation you are in. These are managed in the Agent Builder. If an agent's processing settings change after its files were indexed, those files may show a Stale badge in the Agent Builder (see Re-embedding below).
Duplicate upload detection
When you upload a file, Intra AI checks whether the same file (or a file with the same name) already exists in your library. If a conflict is found, a dialog appears instead of creating a silent duplicate.
The duplicate-file conflict dialog offering Replace, Keep both, and Cancel
The dialog tells you whether the conflict is because the file is identical (same bytes, byte-for-byte match) or because it has the same name but different contents. You then choose:
| Option | What happens |
|---|---|
| Replace | Deletes the existing file from your library and keeps the new upload. |
| Keep both | Uploads the new file alongside the existing one. Both remain in your library. |
| Cancel | Stops the upload. Nothing in your library changes. |
If you drop multiple files at once and more than one causes a conflict, the dialogs queue up and appear one at a time.
Note: Agent context documents and files currently in an error state are excluded from duplicate checking.
File preview
Click any Ready file row in the library (or in the citations panel) to open the in-app preview.
- PDFs render inline with page navigation. When you open a preview from a citation, the PDF scrolls directly to the cited page.
- Images (JPEG, PNG, WebP, GIF, TIFF) render inline.
- Plain text, Markdown and CSV render inline.
- DOCX, XLSX, PPTX, EML, MSG cannot be rendered in the browser. A Download button appears instead so you can open the file locally.
Translating a file
You can translate any Ready document into another language. This feature is only available when your administrator has enabled file uploads.
- Hover over a file row in the library.
- Click the translate icon (the translate / languages glyph) that appears in the action buttons on the right.
- A row of language buttons appears below the file: EN, DE, FR, ES, IT.
- Click the target language. Translation runs in the background using the workspace's default AI model.
- When complete, a new file appears in your library. Its name mirrors the original (for example,
Vertrag.en.docxfor an English translation ofVertrag.docx). The original stays untouched.
Notes on translation:
- The output format mirrors the source: a
.docxinput produces a.docxoutput; a.txtinput produces a.txtoutput. Other input formats (such as PDF) fall back to.md. - Translated files cannot themselves be translated again – the translate button does not appear on them.
- The file row shows a Translated to [LANG] label so you can distinguish a translation from its original.
- Each translation call uses AI tokens from your balance.
Re-embedding (Stale files in Agent Builder)
When an administrator changes how documents are processed – for example, switching the chunking strategy or changing the embedding model – files that were indexed under the old settings become stale. Stale files still work (the old index chunks are still served), but they are not optimally indexed for the current settings.
In the Agent Builder, stale knowledge files show an amber Stale badge. A notice above the file list says how many files are stale and offers a Re-embed stale files button. Clicking it re-processes the affected files in the background (up to three concurrently) so they are re-indexed under the current settings. You can also re-embed a single file using the individual re-embed icon next to it.
This only appears in the Agent Builder for agent-level knowledge files. Personal files on the Files page do not show a Stale badge.
Deleting a file
- Hover over a file row in the library.
- Click the trash icon that appears on the right.
- A confirmation bar appears below the file row.
- Click Delete to confirm, or Cancel to keep the file.
Deleting a file removes it completely and permanently:
- The file is deleted from object storage.
- All indexed text chunks are deleted from the vector database.
- The file is removed from any conversation it was attached to.
- The file is removed from any project it belonged to.
Warning: Deleting a file cannot be undone.
File expiry
Files are kept for 90 days by default. After that they expire and are deleted automatically – including the stored file, all indexed chunks, and all conversation associations. Your administrator can change this duration for your workspace.
Reference tables
Accepted file types and extraction method
| Extension(s) | Category | Text extraction |
|---|---|---|
.pdf | Document | Text layer → OCR (Tesseract) → Vision (optional) |
.docx | Document | python-docx (paragraphs + tables) |
.xlsx | Spreadsheet | openpyxl |
.pptx | Presentation | python-pptx |
.txt | Text | Direct read |
.md | Markdown | Direct read (heading-aware) |
.csv | Data | pandas |
.eml | Python email stdlib (headers + body + attachment filenames) | |
.msg | Outlook email | extract-msg (subject / from / to / date + body) |
.jpg, .jpeg, .png, .webp, .gif, .tiff | Image | OCR (Tesseract) → Vision (optional) |
Status badges
| Badge | Colour | Searchable? | Meaning |
|---|---|---|---|
| Processing | Blue (pulsing) | No | Extraction and embedding are running. |
| Ready | Green | Yes | Fully processed and searchable. |
| Direct processing | Amber | No (agent reads it whole) | Bypass-RAG agent context document. |
| Error | Red | No | Processing failed – check the hover tooltip and the error detail. |
File row actions (hover to reveal)
| Icon | Action | Available when |
|---|---|---|
| Translate / languages glyph | Translate | File is Ready and was not itself produced by translation. |
| Trash icon | Delete | Always (requires a second confirmation click). |
| × | Detach from conversation | In the conversation attach panel only. |
Tips & notes
Tip: Search and type filters work together. Set the PDF filter and type a filename fragment to narrow a large library quickly.
Tip: For scanned PDFs (image-only), text extraction depends on OCR or a vision model. If a scanned PDF ends up in Error state with the "vision model needed" hint, ask your administrator to enable a vision-capable model, then re-upload the file.
Tip: For large reference documents (a 200-page technical manual, for example), semantic search mode finds the most relevant passages automatically. You do not need to split the document manually.
Note: Changing the embedding model after files are already indexed requires re-indexing all files. Until then, old files continue to work but may return slightly less accurate results.
Note: The Direct processing badge means the file belongs to an agent configured to read it in full rather than search it. This is set by the agent builder, not something you can change on a personal file.
Warning: Deleting a file removes it from every conversation and project it was attached to. There is no undo.
Troubleshooting
| Symptom | Likely cause | What to do |
|---|---|---|
| Upload rejected – feature disabled | Uploads are turned off for your workspace (the upload zone still appears, but the server returns a 403). | Ask your administrator to enable the uploads feature. |
| Upload rejected – unsupported type | The file extension is not in the accepted list. | Check the supported types table above and convert the file if needed. |
| Upload rejected – file too large | The file exceeds the size limit (default 50 MB). | Compress or split the file, or ask your administrator to raise the limit. |
| File stays on Processing for a long time | The processing service may be busy or unavailable. | Wait a few minutes. If it remains in Processing, contact your administrator. |
| File shows Error – "vision model needed" | The file is a scanned PDF and no vision model is configured. | Ask your administrator to enable a vision-capable model under Admin → AI Providers. |
| File shows Error – "embedding dimension mismatch" | The embedding model was changed and the index dimension no longer matches. | Contact your administrator. |
| The AI does not reference my file | The file may not be attached to the conversation, or it may not be Ready. | Open the attach panel and confirm the file is listed as attached and has a Ready status. |
| The file preview shows a Download button | That format (DOCX, XLSX, PPTX, EML, MSG) cannot be rendered in the browser. | Download the file and open it locally. |
| The translate icon does not appear | The file is not Ready, or the file is itself a translation. | Ensure the file status is Ready. (The icon still appears when uploads are disabled, but clicking it is rejected with a 403 and a "Translation failed" message.) |
| I cannot see a colleague's file | Personal files are private by default. | Ask your colleague to add the file to a shared project; you can then access it via that project. |
| Sources panel does not appear after an answer | The AI answered without using file content (the answer came from its training, not your files). | Check that the file is attached and in Ready status. For large files, try asking a more specific question so semantic search finds the right passage. |
Frequently asked questions
Q: Does the AI read the whole file every time I ask a question? A: It depends on file size. For small files (under 200 KB combined across all attached files), the full content is included. For larger files, the system finds and includes only the most relevant passages. Either way, the AI cites exactly which part it drew from.
Q: Can I attach the same file to multiple conversations? A: Yes. Attaching a file to a conversation is a link, not a copy. The same file in your library can be attached to as many conversations as you like.
Q: What happens to my files if I delete a conversation? A: The files themselves are not deleted – they stay in your library. Only the link between the conversation and the files is removed.
Q: Can I upload a file directly in the chat without going to the Files page? A: Yes. Click the + (add) button in the message composer, then use the upload option in the panel that opens. The file is added to your library and attached to the current conversation at the same time.
Q: Can I paste an image into the chat? A: Yes. Paste an image from your clipboard directly into the message input box to attach it to your current message.
Q: What languages does translation support? A: English (EN), German (DE), French (FR), Spanish (ES), and Italian (IT). The output file format mirrors the source (a DOCX source produces a DOCX translation, and so on).
Q: Do translated files count against my token balance? A: Yes – each translation call uses AI tokens from your balance. The translated file is also saved as a new file in your library, separate from the original.
Q: Will my files ever be visible to other users? A: Personal files are only visible to you. If you add a file to a project, it is visible to members of that project only – no other users or projects.
Q: What does the Stale badge mean in the Agent Builder? A: It means the file was indexed under different processing settings than those currently in use. The file still works, but re-embedding it will re-index it under the current settings for better accuracy.
Related: Chatting · Projects · AI Agents · Search & Bookmarks