Skip to content

Getting Started

Intra AI is a private AI workspace for your organisation. This guide walks you through everything from your very first sign-in to your first conversation – and gives you a tour of every part of the interface so you always know where to go.

What Intra AI is

Intra AI is an AI workspace that brings chat, agents, projects, files with semantic search, and integrations together in one place. Your organisation gets its own dedicated instance, isolated from every other organisation at the infrastructure level. Development, data storage and AI inference all take place in Germany. Intra AI operates the instance for you, so you get updates without carrying any maintenance work yourself; running it in your own data centre is possible on request.

Your conversations, files and data stay inside your instance. The one exception is web search: where it is switched on, the query text is sent to an EU-operated search service. Exactly what is transmitted is set out under Web search.

The AI models available to you are configured by your administrator. The models you see when you open a chat are the ones chosen for your organisation.

Intra AI is modular. Each feature area can be turned on or off per workspace by your administrator:

  • Agents – AI assistants tailored for specific tasks
  • Projects – shared workspaces with a shared document library
  • File uploads – attach documents so the AI can read and quote from them
  • Integrations – connect Google Workspace, Microsoft 365, and other external services
  • Web search – let the AI search the live web when answering
  • Bookmarks – save important messages for later
  • Conversation search – find text across all your past chats
  • Speech input – dictate messages instead of typing
  • Chat sharing – invite colleagues into a conversation

Navigation items and composer controls appear only for features that are enabled. If you do not see something described in these docs, it may be switched off for your organisation.

Note: Your administrator manages which features are available. If you need a feature that is not visible, ask them to enable it.


How you get an account

There is no public sign-up for Intra AI. An administrator creates your account, in one of these ways:

  • Direct account creation – your administrator sets up your account and sends you your credentials.
  • Invite link – you receive a personal invitation link by email. The link expires – by default after 7 days (your administrator can choose between 1 and 365 days) – so open it promptly.
  • Bulk invites – for larger rollouts, administrators can invite many people at once from a list.

Your primary credential is a local email address and password. If your organisation uses a single sign-on (SSO) provider, a dedicated SSO button also appears on the login screen – it is only shown when your administrator has configured one.

Note: Self-registration is off by default. In most organisations your account is created for you; you will not see a "Create account" option.

The Intra AI login screen with email, password, and optional SSO or passkey sign-inThe Intra AI login screen with email, password, and optional SSO or passkey sign-in


First login: terms, two-factor authentication, and passkeys

Depending on how your organisation has set things up, you may be guided through a few steps the very first time you sign in.

Terms acceptance

If your administrator has turned on a terms gate, an acceptance dialog appears before you can access the workspace. You must accept the terms to continue. If you decline, you are signed out immediately.

Two-factor authentication (2FA)

Two-factor authentication (2FA) adds a second check on top of your password. If your organisation requires it and you have not set it up yet, a setup screen appears right after your first login, before you reach the workspace.

To set it up:

  1. Open your authenticator app on your phone (any standard TOTP app works – the one you already use for other services is fine).
  2. Scan the QR code shown on screen.
  3. Save the backup codes that appear (copy or download them) and confirm you have stored them.
  4. Type the six-digit code your app shows, and confirm.

From that point on, each login asks for your password and then a fresh code from your app.

Tip: Write down your backup codes and store them somewhere safe. Backup codes let you sign in if you lose access to your phone.

Passkeys

Passkeys let you sign in with biometrics (fingerprint or face recognition) or a hardware security key, instead of typing a password. You can register a passkey at the same setup step, or later under Settings → Security.

Note: The passkey option only appears when your administrator has enabled it. If you do not see it, your organisation has not turned it on.


Guided onboarding tours

After your first login, Intra AI offers short, interactive tours that point out the key parts of the interface. You are not required to complete them – each tour is optional and can be skipped or paused at any time.

  • A base tour fires automatically on your first visit and walks you through the chat interface.
  • Feature tours for Agents, Projects, Files, and Integrations are offered one at a time as you explore those areas.
  • Shorter action tours – Agent Builder, New Project, and Connect Integration – start when you first perform those actions; they appear in the same Settings list and can be replayed individually.

If you want to replay a tour later, go to Settings → Onboarding and either restart all tours or pick a specific one to replay.

Note: Your administrator can switch tours off entirely; the automatic first-visit tour is also only offered to accounts created after the tour feature was rolled out – you can always start it manually from Settings → Onboarding.


Announcement banner

Your administrator can post news or notices (planned maintenance, new features, policy updates) that appear as a thin banner at the top of the new-chat screen. Click the banner to read the full announcement, or click × to dismiss it. Past announcements are available in Settings → News (the News tab is part of the announcements feature and disappears if your administrator disables announcements).


Your first chat in 60 seconds

This is the fastest path from zero to a real answer.

  1. Open a new chat. Click New chat in the sidebar. You land on an empty chat screen with a text box at the bottom.

  2. Pick a model. Look at the centre of the header – you will see a pill-shaped button showing the current model name. Click it to open the model list and pick the model you want to use. Your administrator decides which models appear. If you are not sure which to pick, the default (pre-selected) model is the one your administrator has recommended for general use.

    Note: When you are working with an agent, the model selector shows a lock icon and the model name. This means the agent's model is in use and cannot be switched manually – the agent always uses its configured model for consistent results.

  3. Type your message in the text box at the bottom of the screen and press Enter (or click the send button). Your request is sent immediately.

  4. Watch the answer stream in. The reply appears word by word as the AI writes it. You do not need to wait for the whole answer before reading the start.

  5. Continue the conversation. Type your next message in the same box to follow up, ask for clarification, or take the answer in a new direction. The AI remembers everything said in this conversation.

A chat conversation showing a formatted answer with a summary, a table of figures, and a ranked list of risksA chat conversation showing a formatted answer with a summary, a table of figures, and a ranked list of risks

Answers are formatted for easy reading: headings, bullet lists, tables, and code blocks all render cleanly.

Optional controls in the composer

Before you send a message you can also:

  • Attach a file with the + (attach) button – the AI reads it and can quote from it directly in its answer.
  • Turn on Search with the web-search button – the AI fetches live results from the web and cites its sources.
  • Turn on Research – a deeper, multi-step web research mode for questions that need more than a quick search (shown alongside Search; only one of the two can be active).
  • Turn on Think – the AI reasons more deeply before answering; on models that support it, you can also pick an effort level (Low / Medium / High).

You can enable any combination of these on a message-by-message basis.

Tip: The more specific your request – audience, format, length, tone – the better the answer. "Summarise this in five bullet points for a non-technical manager" gets a far more useful result than "summarise this."


A tour of the interface

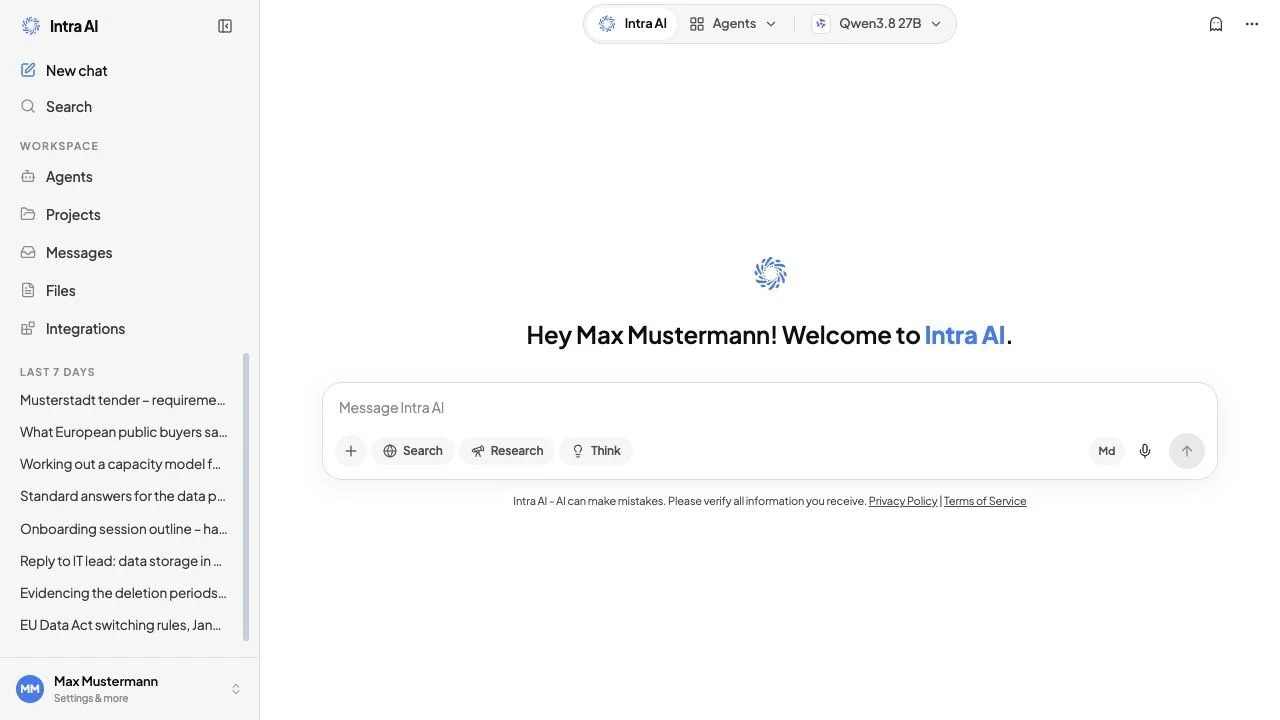
The sidebar on the left is your main navigation. If you do not see it, click the panel icon in the top-left corner to open it.

ItemWhat it does
New chatOpens a fresh, empty conversation.
SearchOpens a panel to search across all your past conversations. Shown when conversation search is enabled.
AgentsOpens the agents area, where you can browse and launch AI assistants built for specific tasks. Shown when agents are enabled.
ProjectsOpens your shared project workspaces. Shown when projects are enabled.
FilesOpens your file library – personal uploads and any files shared in your projects. Always shown.
IntegrationsConnect external services such as Google Workspace or Microsoft 365. Shown when integrations are enabled.

Below the navigation links, the sidebar lists your conversation history, grouped by date (today, last 7 days, last 30 days, and then by month). Pinned conversations appear at the top of the list.

The new-chat screen showing the model selector in the header, the composer, and the sidebarThe new-chat screen showing the model selector in the header, the composer, and the sidebar

The centre of the header shows the model selector – the pill-shaped button that lets you choose which AI model answers your questions. Click it to see the available models and switch between them.

When an agent is active, the model selector shows a lock icon and the agent's model name. Switching is disabled while the agent is in use.

Account menu

At the very bottom of the sidebar is your name and a small chevron. Click it to open the account menu, which contains:

ItemWhat it does
Token balanceShows how many tokens you have remaining this period and a usage bar. Tokens are consumed as you chat; your administrator sets your starting balance and any automatic top-up schedule.
MemoryFacts you want the AI to remember across all your conversations. You can add, edit, and remove entries here. Not shown in temporary chats.
BookmarksSaved messages you have bookmarked for easy reference. Shown when bookmarks are enabled.
ArchivedConversations you have archived to keep the main list tidy.
SettingsYour personal preferences: theme, language, security, sessions, and onboarding.
DocumentationOpens the Intra AI user documentation (this site) in a new browser tab.
Sign outEnds your session on this device.

Administrators also see an Administration entry, which opens the administration panel. (Managers with delegated admin capabilities see it as Manager Console.)

Sidebar navigation and the open account menu showing token balance, Memory, Bookmarks, Archived, and SettingsSidebar navigation and the open account menu showing token balance, Memory, Bookmarks, Archived, and Settings


Five prompts to try right now

Not sure what to ask first? These are the kinds of everyday requests Intra AI handles well:

  • "Summarise this quarterly report and highlight the three biggest risks." – attach the report with the + button first.
  • "Draft a friendly follow-up email to a client who hasn't replied in two weeks."
  • "Turn these meeting notes into a clear action-item list with owners and due dates."
  • "Translate this product description into formal German for our website."
  • "Explain the difference between gross and net margin with a simple example."

Each of these is a good first conversation. They need no special setup – just type and press Enter.


Why can't I see X?

Most missing features have one of these causes:

SymptomLikely causeWhat to do
A sidebar item (Agents, Projects, Integrations) is not visibleYour administrator has not enabled that feature for your workspaceAsk your administrator to enable it in the admin panel
The model selector shows only one model, or a model you expected is missingYour administrator controls which models are availableAsk your administrator – they can add or change models in the admin panel
The web-search, file-attach, or speech button is not in the composerThat feature is disabled for your workspace (the speech button also requires a browser with microphone recording support)Ask your administrator
The SSO button does not appear on the login screenNo SSO provider has been configured for your instanceYour administrator needs to set one up
The passkey option does not appear in Settings → SecurityPasskeys have not been enabled for your instance, or you sign in through SSO (passkeys are only offered for local email/password accounts)Ask your administrator
You see a terms-of-use dialog every time you sign inA new version of the terms has been publishedRead and accept the updated terms to continue
Your token balance is very low or at zeroYou have used your allocation for this periodYour administrator sets your balance and any automatic top-up; contact them to increase your limit or wait for the next top-up

Note: All of the above are controlled by your administrator, not by Intra AI support. Your first point of contact for missing features or access issues is always your internal administrator.


Where to go next

Once you have had your first chat, here is a good order to explore the rest of the platform:

  1. Chat – the full guide to conversations: attachments, web search, sharing, and more.
  2. Agents – AI assistants built for specific tasks, like summarising meetings or drafting emails.
  3. Projects – shared workspaces where you and your colleagues can collaborate with a shared document library.
  4. Files & Knowledge – upload your own documents so the AI can answer from them directly.
  5. Login & Security – two-factor authentication, passkeys, and managing your active sessions.

Related: Chatting · AI Agents · Projects · Files & Knowledge · Login & Security